


👉 Fetch Rest API
Sometimes we need to fetch an API or database data through an API. Then this automation script will be convenient for you to bring those APIs using the request-HTML module. This handy script will let you fetch any Rest API and return your response data.
# Rest API
# pip install requests-htmlimport requests_htmlURL = "https://medium.com/"session = requests_html.HTMLSession()
headers = { "User-Agent": "Mozilla/5.0" }req = session.get(URL, headers=headers)
req.html.render()print(req.status_code)
print(req.html.html)
👉 Automate CSV
This automation script will let you easily read and write CSV files. This script uses the Pandas module and below you can find the helpful methods that will be useful to automate your CSV.
# Automate CSV
# pip install pandasimport pandas# Read CSV File
data = pandas.read_csv("test.csv")# Read CSV Specific Column
data = pandas.read_csv("test.csv", usecols=["col1", "col2"])# Read CSV Specific Rows
data = pandas.read_csv("test.csv", nrows=5)# Read CSV Specific Rows and Columns
data = pandas.read_csv("test.csv", usecols=["col1", "col2"], nrows=5)# Read CSV File and Convert to JSON
data = pandas.read_csv("test.csv").to_json(orient="records")# Write CSV File
data = {"col1": ["a", "b", "c"], "col2": [1, 2, 3]}
data = pandas.DataFrame(data)
data.to_csv("test.csv", index=False)# Append Column to CSV File
data = pandas.read_csv("test.csv")
data["col3"] = ["x", "y", "z"]
data.to_csv("test.csv", index=False)# Append Row to CSV File
data = pandas.read_csv("test.csv")
data = data.append({"col1": "d", "col2": 4}, ignore_index=True)
data.to_csv("test.csv", index=False)# Drop Column from CSV File
data = pandas.read_csv("test.csv")
data = data.drop(columns=["col3"])
data.to_csv("test.csv", index=False)# Drop Row from CSV File
data = pandas.read_csv("test.csv")
data = data.drop([2])
data.to_csv("test.csv", index=False)
👉 Upscale Your Photos
Now you can upscale your Photos resolution up to 2k, 3k, and 4k easily with this super automation script that uses the Super-Image module. This cool module uses a machine learning algorithm that will upscale the resolution of your photos by filling the missing pixels using different AI models.
# Upscale Your Photos
# pip install super-image
# pip install pillowfrom super_image import *
from PIL import Imagedef UpscaleImage(img_file, scale_value):
    img = Image.open(img_file)
    model = EdsrModel.from_pretrained('eugenesiow/edsr-base', scale=scale_value)
    photo = ImageLoader.load_image(img)
    upscale = model(photo)
    ImageLoader.save_image(upscale,  './upscale.png')UpscaleImage('test.jpg', 4)
👉 PDF to Audio
Create your own Audiobook or convert any pdf to audio format with this killer automation script that uses Text-to-speech and PyPDF2 module. This is handy when you want to convert your whole PDF book or Text to audio format.
# PDF to Audio
# pip install text-to-speech
# pip install PyPDF2from text_to_speech import speak
from PyPDF2 import PdfFileReaderdef PDFtoAudio(pdf_path):
    text = []
    with open(pdf_path, 'rb') as f:
        pdf = PdfFileReader(f)
        for page in pdf.pages:
            text.append(page.extractText())
    speak(' '.join(text), 'en', save=True, file='audio_book.mp3')PDFtoAudio('test.pdf')
👉 Generate Text
Have you ever wondered if you just write some Topic and Python generates the whole text according to that topic? Well with this awesome automation script you can do that. This script uses the Transformer module that uses the GTP2 module in its background to generate the text by a given topic.
# Generate Text
# pip install transformersfrom transformers import pipelinedef Generate_Text(txt):
    gen = pipeline("text-generation", model="gpt2")
    output = gen(txt, max_length=100, num_return_sequences=1)
    return output[0]['generated_text']print(Generate_Text("Science of the future"))
👉 News Fetcher
Fetch fresh daily headlines and news articles with the below simple automation script that uses the Newsapi-python module that is connected to the NewsAPI server.
# News Fetcher
# pip install newsapi-pythonfrom newsapi import NewsApiClientnews = NewsApiClient(api_key='YOUR_API_KEY')# Fetch Top Headlines
headlines = news.get_top_headlines(q='Nasa', language='en', country='us')
print(headlines)# Fetch News by date
articles = news.get_everything(q='Nasa', from_param='2020-01-01', to='2020-01-02')
print(articles)# Fetch All News
all_news = news.get_everything(q='programming', language='en', sort_by='relevancy')
print(all_news)
👉 Automate Google Searches
Get the top google searches with this Killer automation script that uses the Request module to fetch the Google search page and the BS4 module that will extract the search results data.
This handy script will allow you to fetch top searches and even crawl page by page too.
# Automate Google Searches
# pip install requestsimport requests
from bs4 import BeautifulSoupdef GoogleSearch(query):
    url = "https://www.google.com/search?q=" + query

    headers = {
        "User-Agent": "Mozilla/5.0"
    }
    response = requests.get(url, headers=headers)
    soup = BeautifulSoup(response.text, "html.parser")    for item in soup.find_all("div", {"class": "g"}):
        link = item.find("h3").find("a")["href"]
        title = item.find("h3").find("a").text
        description = item.find("span", {"class": "aCOpRe"}).text
        print("Title: ", title)
        print("Description: ", description)
        print("Link: ", link)GoogleSearch("python")
👉 Send Marketing Emails
Sending marketing Emails to your audience is a common thing for any business. But you can now automate this process using this Python automation script. This fabulous script uses the Mailjet module that allows you to send 200 Emails per day for free. You can get their API easily and automate your Emails.
# Send Marketing Emails
# pip install mailjet-restfrom mailjet_rest import ClientSMTP = Client(auth=("api_key", "api_secret"))
email_data = {
    'Messages': [
        {
            "From": {
                "Email": "from_email",
                "Name": "from_name"
            },
            "To": [
                {
                    "Email": "to_email",
                    "Name": "to_name"
                }
            ],
            "Subject": "Test Email",
            "TextPart": "Hi there, this is a test email",
        }
    ]
}
mail = SMTP.send.create(data=email_data)
print(mail.status_code)
print("Email sent")
👉 Send Discord Webhooks
Now you can send discord webhooks easily with this awesome automation script. Below I wrote methods that will help you send discord webhook with simple content, embedded content, and much more.
# Send Discord Webhooks
# pip install discordwebhookfrom discordwebhook import Discordwebhook = Discord(url = "Webhook URL")# Post a content
webhook.post(content = "Hello Medium!")# Post with username
webhook.post(content = "Hello Medium!", username = "Medium")# Post with Embed Content with URL
webhook.post(content = "Hello Medium!", username = "Medium",
embeds = [{
    "title": "Medium", "url": "https://medium.com/"
}])# Post with Embed Image
webhook.post(embeds=[{"title": "Hello Medium!",
"image": {
    "url": "http://www.eg.com/image.jpeg"
}}])
👉 Airtable Extractor
Want to extract Airtable data then use this awesome automation script that uses the Airscraper module that will simply take the shareable URL of Airtable then extract the data and store it in the CSV format.
# Airtable Scraper
# pip install airscraperfrom airscraper import AirScraperdef Airtable(urls):
    scraper = AirScraper(["Urls"])
    data = scraper.get_table().text
    print("Data: ", data)
    with open('data.csv','w') as f:
        f.write(data)Airtable(["https://airtable.com/123"])
1. Share QR with Wifi
Tired of telling your wifi passwords to your friends again and again then try this cool automation script that uses the WifiQRcode module that will help you create a QrCode for your Wifi that your friends can scan with their phone and connect.
# Wifi QrCode
# pip install wifi_qrcode_generatorimport wifi_qrcode_generator as wifi

# Generate Wifi QR code
qrcode = wifi.generate_qrcode("Wifi Name", False, "WPA", "Password")# Save QR code
qrcode.save("Wifi.png")
2. Grammar and Spell Fixer
Fix your grammar and spelling mistakes in your doc files or Text by using this awesome automation script that uses the Gingerit module that can scan your Text and give your corrected spelling and grammar suggestion.
This handy script is connected with Gingerit web grammar fixer that gives unlimited api calls.
# Grammer and Spell Fixer
# pip install gingeritimport gingerit as gingerText = """This is an example of a sentence that is not
grammerly correct. A spell checker can't fix this."""Grammer = ginger.GingerIt()
result = Grammer.parse(Text)# Original
print(result['text'])# Grammerly Corrected
print(result['result'])
3. Extract Webpages
Do you need a script for extracting the webpage's source code then here is the script that you can use. This automation script uses the famous Urllib3 module that will allow you to fetch any webpage.
- Handy Script for Web Scrapers
- Extract Website Html code
- and much more
# Extract Webpages
# pip install urllib3from urllib.request import Request, urlopenurl = "https://www.medium.com/"headers = { 'User-Agent' : 'Mozilla/5.0' }
req = Request(url, headers=headers)webpage = urlopen(req).read()
print(webpage)
4. Parse Webpages
Extracting a webpage is one side work but when you need to extract the data from that extracted webpage then this automation script will be useful for you. This script is based on the BS4 module that is specially designed for Parsing the webpage content to extract the data.
- Parse any webpage
- Use Script in your Web Scraping Project
- Search data with the different HTML element
- Much more
# Parse Webpages
# pip install bs4from bs4 import BeautifulSoup# Parse HTML
soup = BeautifulSoup(webpage, 'html.parser')# find element
html = soup.find('title')# find multiple element
html = soup.find_all('title')# find element by class
html = soup.find('title', class_='title')# find element by xpath
html = soup.find('title', attrs={'id':'title'})# Extract Text
html = soup.find('title').text# Extract URL
html = soup.find('title')["href"]# Extract Attribute
html = soup.find('title').get("class")
5. Images to Text
Convert your Images or scanned photos to Text by using this fabulous automation script. This script uses the Pytesseract module which is an AI algorithm that can extract the text from images. Pillow on the other hand will help you to optimize and enhance your Photos before Pytesseract does its job.
- Extracting from OCR Images
- Extract text from Scanned Docs
- Can be used in your OCR project
- Much more
# Images to Text
# pip install pytesseract
# pip install Pillowimport pytesseract as tess
from PIL import Image, ImageFilter, ImageEnhancedef Image_to_Text(img_file):
    img = Image.open(img_file)
    img = img.filter(ImageFilter.MedianFilter())
    enh = ImageEnhance.Contrast(img)
    img = enh.enhance(2)
    img = img.convert('1')
    img.save('tmp.png')
    text = tess.image_to_string(Image.open('tmp.png'))
    return text

Image_to_Text('test.png')
6. Generate Secure Passwords
Secure Passwords are always a great way to protect your privacy and by using an automation script you can now generate secure passwords of any length. This script uses a Random and String module that takes the length and creates a secure password for you.
- Create a Password Generate
- Use this in your Password Project
- Much more
# Generate Secure Passwordsimport random
import stringdef generate_password(length):
    """Generate a random password of length 'length'."""
    password = ''
    for i in range(length):
        password += random.choice(string.ascii_letters + string.digits)
    return password

generate_password(10)
7. Take Web Screenshots
Capture the high-resolution Web screenshots by using this awesome script that uses the Selenium module. This script is very handy when you have a lot of website to capture their screenshots.
# Take Web Screenshots
# pip install seleniumfrom selenium import webdriverdriver = webdriver.Chrome()
driver.get('https://www.medium.com')H = driver.execute_script("return document.body.scrollHeight")
W = driver.execute_script("return document.body.scrollWidth")driver.set_window_size(W, H)
driver.find_element_by_tag_name('body')
driver.screenshot('screenshot.png')
8. Send Phone SMS
Need to Phone SMS programmatically then try this automation script that uses the awesome Mailjet SMS Api that will allow you to send SMS to multiple countries and numbers.
- Send Marketing SMS
- Sms sending Program
- Much more
# Send Phone SMS
# pip install requestsimport requestsurl = "https://api.mailjet.com/v4/sms-send"headers = {
    'Authorization': "Bearer $API_KEY",
    'Content-Type': "application/json",
}payload = {
    "Text": "Have a nice SMS from Medium :) ",
    "To": "+xxxxxxxxxx",
}response = requests.post(url, headers=headers, data=payload)
print(response.status_code)
9. Python Modern GUI
This automation script will help you to create the modern Gui app with Python. This handy script uses the Tkinter module that can be used to create a modern and eye-catching app. Below I mention some useful methods that will help you build your awesome GUI app.
# Modern GUI with Python
# pip install tkinterimport tkinter as tk
from tkinter import filedialogr = tk.Tk()# set title
r.title("Medium GUI")# set size
r.geometry("400x400")# Create a label
label = tk.Label(r, text="Hello World")
label.place(x=10, y=10)# Create a Inputbox
value = tk.StringVar()
inputbox = tk.Entry(r, textvariable=value)
inputbox.place(x=10, y=50)# Create a Button
button = tk.Button(r, text="Click Me")
button.place(x=10, y=100)# Checkboxes
opt1 = tk.IntVar()
check = tk.Checkbutton(r, text="Check Me", variable=opt1)
check.place(x=10, y=150)# Import Image
img = tk.PhotoImage(file="image.png")
image = tk.Label(r, image=img)
image.place(x=10, y=200)# File Dialog
filedialog.askopenfilename(parent= r)# run the app
r.mainloop()
10. Run CMD Commands
Need to run the Terminal or CMD commands on python then here is the automation script that will show you how to do it. Below you can find multiple examples like running a simple command, capturing the output of the command and etc.
# Run CMD Commandsimport subprocess# Run python script from cmd
subprocess.call(['python', 'test.py'])# Run Command with Arguments
subprocess.call(['python', 'test.py', 'arg1', 'arg2'])# Run command and get output
output = subprocess.Popen(['python', 'test.py'], stdout=subprocess.PIPE).communicate()[0]
print(output)# Run command as admin
subprocess.call(['runas', '/user:Administrator', 'python', 'test.py'])
automation projects with code. So mark this article and let's get started.
 Email Sender
Email is always the best way of marketing and communicating professionally. Now you can send Emails programmatically with Python. This awesome Mini project uses the Yagmail module that will show you how to send an email on any mail server.
# Send Email with Python
# pip install yagmailfrom yagmail import SMTPdef Email_Sender(subject, body):
mail = SMTP(user='username', password='password')
mail.send("Cette adresse e-mail est protégée contre les robots spammeurs. Vous devez activer le JavaScript pour la visualiser. ", subject = subject, contents = body)
mail.close()
print("Email Sent")def Email_With_Attachment(subject, attachment):
mail = SMTP(user='username', password='password')
mail.send("Cette adresse e-mail est protégée contre les robots spammeurs. Vous devez activer le JavaScript pour la visualiser. ", subject = subject, attachments = attachment)
print("Email Sent")# main
Email_Sender("Subject101", "Hello from Medium")
Email_With_Attachment("Subject102", ["img1.png", "img2.png"])
PDF To Audiobook
Need to convert your PDF To an audiobook then here is a mini project that uses the Google text-to-speech Api and PyPDF4 module to convert all pages of your pdf to an audiobook.
# PDF to Audiobook
# pip install PyPDF4
# pip install gTTSfrom PyPDF4 import PdfFileReader
from gtts import gTTSdef Pdf_to_Audio(file_name):
    pdf = PdfFileReader(file_name)
    for page in range(pdf.getNumPages()):
        text = pdf.getPage(page).extractText()
        tts = gTTS(text=text, lang='en')
        tts.save(f"{page}.mp3")Pdf_to_Audio("book.pdf")
Weather App
This mini project will automate your Weather forecasting task. You can fetch weather information like temperature, humidity and etc by using the below project code. Explore the API to improve your project more or add new functionalities.
# Weather App
# Get Your Free API : http://openweathermap.org/appid
# pip install requestsimport requests as req
from bs4 import BeautifulSoup as bsdef get_weather(loc):
    # Set API
    key = "Api key"
    api_url = f"http://api.openweathermap.org/data/2.5/weather?"
    params = f"q={loc}&appid={key}"

    # Get the response from the API
    url = api_url + params
    response = req.get(url)
    weather = response.json()# Fetch Weather
    print(f"Weather for {loc}:")
    temp = weather['main']['temp']
    print("Temperature:", temp - 273.15, "Celsius")
    humidity = weather['main']['humidity']
    print("Humidity:", humidity, "%")
    wind = weather['wind']['speed']
    print("Wind speed:", wind, "m/s")# main
get_weather('London')
Youtube downloader
Create your own youtube downloader by using the Pytube module. Below you can find mini project codes that download videos from youtube URLs in any format.
# Proofreading Tool
# pip install pytubefrom pytube import YouTube
import osdef downloader(url):
    yt_vid = YouTube(url).streams.filter(progressive=True)
    yt_vid.order_by('resolution').desc().first().download()
    print("video downloaded")downloader("youtube.com/watch?v=id")
Excel Data Entry
Data entry is always costly work to do but now you can automate your data entry in excel with this below mini project. It uses the Openpyxl module that allows you to write and format an excel file with few lines of code.
# Excel Data Entry
# pip install openpyxlfrom openpyxl import Workbook
from openpyxl.styles import *# Set up workbook
book = Workbook("excel.xlsx")
pyexcel = book.active# Set up header
pyexcel.append(["Name", "Job Desc", "Salary"])# Write by rows
pyexcel.append(["John", "JS Programmer", "$100,000"])
pyexcel.append(["Jane", "Py Programmer", "$150,000"])# Write by columns
pyexcel["A1"] = "John"
pyexcel["B1"] = "JS Programmer"
pyexcel["C1"] = "$100,000"# Write by cell
pyexcel.cell(row=1, column=1).value = "John"
pyexcel.cell(row=1, column=2).value = "JS Programmer"# Format cell
pyexcel.cell(row=1, column=1).font = Font(bold=True)# save workbook
book.save("excel.xlsx")
Python Proofreading
Want to make your text Grammer and Spell errors Free then try this mini project that uses the Lmproof module. You can explore the module to expand the functionality of the project.
# Python Proofreading
# pip install lmproofimport lmproofdef proofread(text):
    proofread = lmproof.load("en")
    correction = proofread.proofread(text)
    print("Original: {}".format(text))
    print("Correction: {}".format(correction))proofread("Your Text")
Compress Folders and Files
Having files and folders with large sizes then use this mini automation project to compress your folders and files into lower sizes. This project is based on making the zip compress of your files and folder.
# Compress folders and filesimport zipfile as zf
import os# compress files
def compress_files(files):
    with zf.ZipFile("compress", 'w') as myzip:
        for file in files:
            myzip.write(file)# compress folders
def compress_folders(folders):
    with zf.ZipFile("compress", 'w') as myzip:
        for folder in folders:
            for root, dirs, files in os.walk(folder):
                for file in files:
                    myzip.write(os.path.join(root, file))# main
compress_files(["video1.mp4", "video2.mp4"])
compress_folders(["folder1", "folder2"])
Internet Speed Tester
Test your internet speed and ping with the OOKLA speed test API. This mini automation project will test your download, and upload speed and also calculate the ping.
# Internet Speed tester
# pip install speedtest-cliimport speedtest as st# Set Best Server
server = st.Speedtest()
server.get_best_server()# Test Download Speed
down = server.download()
down = down / 1000000
print(f"Download Speed: {down} Mb/s")# Test Upload Speed
up = server.upload()
up = up / 1000000
print(f"Upload Speed: {up} Mb/s")# Test Ping
ping = server.results.ping
print(f"Ping Speed: {ping}")
Web Blocker
Build a Web blocker project in Python by using the below automation project. This project uses the host file that holds the IP and hostname of the website. If you block a website with the below project the website will always redirect 127.0.0.1.
# Block Websitesimport os
import syshost = "C:\Windows\System32\drivers\etc\hosts"def block_websites(websites):
    with open(host, "a") as f:
        f.write("\n127.0.0.1 " + websites)
        f.close()def unblock_websites(website):
    with open(host, "r") as f:
        lines = f.readlines()
        f.close()
    with open(host, "w") as f:
        for line in lines:
            if websites not in line:
                f.write(line)
        f.close()block_websites(["www.google.com", "www.medium.com"])
Automate Desktop and Web
This mini project will let you automate your desktop apps and website. The project uses the Selenium module which is basically for automating the websites and Pyautogui for automating desktop apps.
# Automate Web and Desktop
# pip install selenium
# pip install webdrivermanager
# pip install pyautoguifrom selenium import webdriver
from selenium.webdriver.common.keys import Keys
from selenium.webdriver.common.by import By
from webdriver_manager.chrome import ChromeDriverManager
import pyautogui as pag# <=== Automate Web ===>
google = webdriver.Chrome(ChromeDriverManager().install( ))# open webpage
google.get('https://www.google.com')# Search element
search = google.find_element(By.NAME, 'q')
search = google.find_element(By.TAG_NAME, 'input')
search = google.find_element(By.ID, 'lst-ib')
search = google.find_element(By.CLASS_NAME, 'gsfi')
search = google.find_element(By.CSS_SELECTOR, 'input[name="q"]')
search = google.find_element(By.XPATH, '//input[id="lst-ib"]')# Click on Element
search.click()# Send Keys or Type
search.send_keys('Hello World')
search.send_keys(Keys.ENTER)# <=== Automate Desktop ===>
# Mouse movement
pag.moveTo(5, 5)
pag.moveRel(5, 5)
pag.dragTo(5, 5)# Mouse clicks
pag.click(5, 5)
pag.doubleClick(5, 5)
pag.rightClick(5, 5)
pag.scroll(5, 5, vertical=True)# Keyboard Typing
pag.typewrite('Hello World', interval=0.25)
pag.press('enter')
pag.hotkey('ctrl', 'c')
Fetch IMDB
You probably use IMDB for getting your best movie for a weekend but do you know you can scrap data from IMDB with Python. This automation script will let you automate the IMDb data scraping in a Pythonic way. Below I coded the standard function you can use.
- You can use it for your IMDB Project
- Scrap and Analyze Movies Data
- Finding the Best movie for your Weekend
- And much more
# IMDB
# pip install imdbpyimport imdbia = imdb.IMDb()# Search for a movie.
search_result = ia.search_movie('The Matrix')# Get the ID of the movie.
movie_id = search_result[0].movieID# Get the movie from ID
movie = ia.get_movie(movie_id)# Get Rating of movie
rating = movie['rating']# Get Plot of movie
plot = movie['plot']# Get Genre of movie
genre = movie['genres']# Get Box office of movie
box_office = movie['box office']# Get Cast of movie
cast = movie['cast']# Get Director of movie
director = movie['director']# Get Writer of movie
writer = movie['writer']# Search for a person.
search_result = ia.search_person('Keanu Reeves')
Email Fetcher
You have seen the Email sending script in my previous articles but not only sending you can fetch the Email too. This automation script will be your handy tool for fetching emails from Gmail, Outlook, or any mail server. Check the below code.
- Extract E-mails for a Project
- Extract emails from Inbox
- Much more
# Fetch Emails
# pip install imap-toolsfrom imap_tools import MailBoxdef Fetch_Email(user, pwd):
    mbox = MailBox('imap.mail.com').login(user, pwd, "INBOX")
    for email in mbox.fetch():
        print(email.date, email.subject, len(email.text or email.html))

Fetch_Email("user", "pass")
Analyze Stock Market
Analyze the Stock market in a Pythonic way by using this automation script. This script uses the YFinancey module that programmatically extracts the stock market information and data for you. You can select multiple stocks, analyze data make charts and graphs, and much more.
- Get Multiple Stocks market
- Track daily market
- Script for your Project
- Script for Creating a market graph
- much more
# Analyse Stock market
# pip install yfinanceimport yfinance as yfmarket = yf.Ticker("MSFT")# Get stockmarket info
info = market.info
print(info)# Fetch historical data
historical = market.history(period="1y")
print(historical)# get actions
actions = market.actions
print(actions)# get dividends
dividends = market.dividends
print(dividends)# get splits
splits = market.splits
print(splits)# get balance sheet
balance_sheet = market.balance_sheet
print(balance_sheet)# get market news
market_news = market.news
print(market_news)# show earnings
earnings = market.earnings
print(earnings)# get recommendation
rec = market.recommendation
print(rec)# Get another Ticker
market1 = yf.Ticker("AAPL")
market2 = yf.Ticker("TSLA")
market3 = yf.Ticker("GOOG")# Fetch Market data from multiple tickers
market_data = yf.download("AAPL", "GOOG", start="2019-01-01", end="2019-12-31")
print(market_data)
PDF Watermark Remover
Need to remove Watermark from your PDF but don’t know how to do it. Then here is the automation script that uses the PyPDF4 module that will remove the Watermark from your PDF files.
You can use the script for removing watermarks for multiple PDF files by keeping the Quality the same.
# PDF Watermark remover
# pip install PyPDF4from PyPDF4 import PdfFileReader, PdfFileWriter
from PyPDF4.utils import b_ as io
from PyPDF4.pdf import ContentStream
from PyPDF4.generic import TextStringObject, NameObjectdef Watermark_Remover(target_text, pdf_file):
    with open(pdf_file, "rb") as f:
        pdf = PdfFileReader(f, "rb")
        out = PdfFileWriter()
        pages = pdf.getNumPages()
        for p in range(pages):
            page = pdf.getPage(p)
            content= page["/Contents"].getObject()
            content2= ContentStream(content, pdf)
            for op, oper in content2.operations:
                if oper == io("Tj"):
                    txt = op[0]
                    m = txt.startswith(target_text)
                    if isinstance(txt, str) and m:
                        op[0] = TextStringObject('')

            page.__setitem__(NameObject('/Contents'), content2)
            out.addPage(page)

        with open("out.pdf", "wb") as outStream:
            out.write(outStream)
target_text = 'Sample'
Watermark_Remover(target_text, "test.pdf")
Image Size Compressor
Script for my making your Images and Photo Sizer lower by keeping the Quality the same. This automation script uses the Pygeutzli module that compresses your Photos to lower their sizes.
This handy script can be used for many purposes.
- Compress Photos for a Project
- Bulk Photo Compressor
- Compressing for your App function
# Compress Photo Size
# pip install pyguetzliimport pyguetzlidef Compress(image):
    img = open(image, "rb").read()
    optimized= pyguetzli.process_jpeg_bytes(img, quality=80)
    output = open("optimized", "wb")
    output.write(optimized)Compress("test.jpg")
PDF Extracting
Extract Text, Images, and Tables from your PDF by using this automation script which uses three different modules. Below you can find the coded script that you are free to use.
- Bulk PDF Extraction
- Extracting Tables from PDF
- PDF extraction for Project
- Much more
# PDF Extracting with Python
# pip install textract
# pip install tabula-py
# pip install PyMupdfimport textract as extract
import tabula as tb
import fitzdef Extract_Text(pdf):
    pdf = extract.process('test.pdf')
    print("Text: ", pdf)def Extract_Photos(pdf):
    doc = fitz.open('test.pdf')
    i = 1
    for page in doc:
        for img in page.getImageList():
            xref = img[0]
            pix = page.getPixmap(xref)
            pix.writePNG(f'test_{i}.png')
            print("Image: ", pix)
            i += 1def Extract_Tables(pdf):
    table = tb.read_pdf('test.pdf', pages='all', multiple_tables=True)
    # save in csv
    tb.convert_into('test.pdf', 'test.csv', output_format='csv', pages='all')
    # save in excel
    tb.convert_into('test.pdf', 'test.xlsx', output_format='xlsx', pages='all')
PySimpleGui
Create an eye-catching and beautiful Gui with this script which uses the PySimpleGui module. This module is simpler and has the power for creating apps for anything in python.
- Creating Gui apps for your Project
- Creating an app for Graphs
- Creating an app for Machine learning
- Much more
# pip install PySimpleGUIimport PySimpleGUI as guilayout = []# Label Text
text = gui.Text('This is PysimpleGui', size=(30, 1))
layout.append([text])# Button
button = gui.Button('Click Me', target='_blank')
layout.append([button])# Input Box
input_box = gui.Input(key='-IN-')
layout.append([input_box])# Browse Folders
browse_folder = gui.FolderBrowse()
layout.append([browse_folder])# Set Image
image = gui.Image('img.png')
layout.append([image])# Radio Buttons
radio = gui.Radio('Radio', ['A', 'B', 'C'])
layout.append([radio])# Check Boxes
check = gui.Checkbox('Check', default=True)
layout.append([check])

# Set window
win = gui.Window('Window Title', layout, auto_size_text=True)

event, values = win.read()win.close()
Merge CSV Files
The simple Automation script will let you merge your multiple CSV files into one file. It will also help you clear the duplicates while merging.
# Merge CSV Files
# pip install pandasfrom pandas import read_csv
import pandas
import osdef Merge_Csv(files):
    df = pandas.concat(map(read_csv, files), ignore_index=True)
    df.to_csv("merged.csv", index=False)
    print("CSV has Been Merged...")Merge_Csv(["movies.csv", "movies2.csv", "movies3.csv"])
Automate Databases
Databases are the organized collection of your Data and we need them in our daily life. But we can organize and Fetch the database with python too. This script use MySql-connecter will help you to connect to your database and let you fetch or execute any SQL Query.
- Use the Script in your Project
- Script for Fetching Database
- Script for Updating Database
# Database with Python
# pip install mysql-connector-pythonimport mysql.connector# Connect to yout SQL database
sql = mysql.connector.connect(
    host="Your host",
    user="username",
    passwd="",
    database="mydatabase_1"
)# create table
cursor = sql.cursor()
cursor.execute("CREATE TABLE movies (title VARCHAR(255), rating VARCHAR(255))")# insert data
query = "INSERT INTO movies (title, rating) VALUES (%s, %s)"
value = ("The Matrix", "7.5")
cursor.execute(query, value)# Select Data
cursor.execute("SELECT * FROM movies")
myresult = cursor.fetchall()
for x in myresult:
    print(x)

# Delete Data
cursor.execute("DELETE FROM movies WHERE title = 'The Matrix'")# Get Specific Data
cursor.execute("SELECT * FROM movies WHERE title = 'The Matrix'")
myresult = cursor.fetchall()# Update Data
cursor.execute("UPDATE movies SET rating = '8' WHERE title = 'The Matrix'")# Delete Table
cursor.execute("DROP TABLE movies")# Close Connection
sql.close()
Reddit Bot
Reddit is an awesome social media platform but you know you can extract and create a bot for Reddit too in Python. This script is a simple explanation that will let you create a super Reddit bot by using the Praw module.
- Create a Reddit bot for Project
- Fetch Reddit data
- Bot tracking Subreddit
- Much more
# Reddit Bot
# pip install prawimport prawreddit = praw.Reddit(client_id='',
                    client_secret='',
                    user_agent='',
                    username='',
                    password='' )# Get the SubReddit
subreddit = reddit.subreddit('python')# Get the top 10 posts
for sub in subreddit.hot(limit=10):
    print(sub.title)# Get Info of a post
sub = subreddit.hot(limit=1)
print(sub.title)
print(sub.author)
print(sub.id)
print(sub.ups)
print(sub.downs)
print(sub.visited)# Get the comments of a post
for comment in sub.comments:
    print(comment.body)# Get Permalink of Comment
for comment in sub.comments:
    print(comment.permalink)# Get the replies of a comment
for comment in sub.comments:
    for reply in comment.replies:
        print(reply.body)# Get Score of a post
for sub in subreddit.hot(limit=1):
    print(sub.score)
automate your stuff. Well put this article on a list and let's get started.
Fetch API
Want to fetch API then try this Python script that uses the well know Urllib3 module design for fetching API and HTML from webpages. Below I mention the functions that will help you.
- Fetch API in your Projects
- Handy tool for Web Scrapers
- Fetch and Store data in JSON
- Much more
# Fetch API
# pip install urllib3import urllib3# Fetch API
api = urllib3.PoolManager()
url = "https://api.github.com/users/example/repos"
response = api.request('GET', url)# Get status
status = response.status# Get data
data = response.data# User agent
user_agent = {'User-Agent': 'Mozilla/5.0'}
response = api.request('GET', url, headers=user_agent)# Use proxy
r = urllib3.ProxyManager('http://proxy.example.com:8080')
response = api.request('GET', url)
Get Daily News
Ever imagined waking up and getting your daily news without seeing the newspaper or checking news websites? Well here is the solution this automation script uses multiple modules to Scrap your Daily news from Google news Title and their URL.
# Get Daily News# pip install bs4
# pip install urllib3from urllib.request import urlopen
from bs4 import BeautifulSoupurl="https://news.google.com/news/rss"
data=urlopen(url)
xml=data.read()html=BeautifulSoup(xml,"xml")
Daily_news=html.find_all("item")for news in Daily_news:
   print("Title: ", news.title.text)
   print("News Url: ", news.link.text)
Add Music in Video
Want to add background music or audio to your videos then do it programmatically with your favorite Python language. This script will show you how to add audio to any video using the Moviepy package.
Handy Script for Developers who want to add background music to their bunch of video files.
- An excellent script for your Project
- Add music to a bunch of your audio files.
# Add Audio to Video
# pip install moviepyfrom ast import Add
from moviepy.editor import *def Add_Audio(video, audio):
    vid = VideoFileClip(video)
    audio_clip = AudioFileClip(audio)
    video_clip = vid.set_audio(audio_clip)
    video_clip.write_videofile("final.mp4")
    print("Audio Added...")Add_Audio("video.mp4", "audio.mp3")
Extract Text from Images
Having a lot of Scanned images or Documents and wanting to extract the Text from them, this automation script uses the Pytesseract module which is an OCR-based Package that will extract Text from scanned docs and images.
- Extracting text from any Images
- Use in your text extracting Project.
- Extract Text from Complex images
- Much more
# Extract Text from Images
# pip install pytesseract
# pip install pillowfrom pytesseract import pytesseract as tess
from PIL import Image as Imgdef Extract_text(image_file):
    path = r'C:\Program Files\Tesseract-OCR\tesseract.exe'
    tess.tesseract_cmd = path
    img = Img.open(image_file)
    config = '--oem 3 --psm 6'
    text = tess.image_to_string(img,  config=config, lang='eng')
    return textExtract_text("img.png")
Transfer Files
Want to transfer files between two Computers/PC then this automation script is for you. Below you will find Client and Server code that you can use to send and receive the file on the same network.
- Send and Recieve multiple files
- Use this in Project
- Handy tool for making a File transfer Bot
# Transfer Filesimport socket
import os# <===CLIENT===>
buffer = 1024
client_host = "Ip Address"
port = 9001
filename = "image.png"
size = os.path.getsize(filename)
sock = socket.socket()print(f"Connecting with{client_host}:{port}")
sock.connect((client_host, port))
sock.send(f"{filename} with Size: {size}".encode())with open(filename, "rb") as f:
    while True:
        reading_byte = f.read(buffer)
        if not reading_byte:
            break
        sock.sendall(reading_byte)
sock.close()# <===SERVER===>
server_host = "Ip Address"
port = 9001
buffer = 1024sock = socket.socket()
sock.bind((server_host, port))
sock.listen(10)
print(f"Waiting for Connection {server_host}:{port}")
client, addr = sock.accept()
print(f"{addr} is connected.")received = client.recv(buffer).decode()
name, size = received.split("-")
name = os.path.basename(name)with open(name, "wb") as f:
    while True:
        reading_byte = client.recv(buffer)
        if not reading_byte:
            break
        f.write(reading_byte)client.close()
sock.close()
Merge PDF Files
Now you can merge multiple PDF files into one PDF file by using this automation script. This also allows you to merge pdf files on basis of Pages. Below I mention two functions 1st for simple merging multiple pdfs and 2nd for merging pdf based on pages that which pages you want to merge.
# Merge PDF files
# pip install PyPDF2from PyPDF2 import PdfFileMergerdef Merge_simple(Pdfs):
    PDF_merger = PdfFileMerger()
    for pdf in Pdfs:
        PDF_merger.append(pdf)
    PDF_merger.write('merged.pdf')
    PDF_merger.close()
    return 'merged.pdf'def Page_Range_Merge(Pdfs, start, end):
    page_merger = PdfFileMerger()
    for pdf in Pdfs:
        page_merger.append(pdf, pages=(start, end))
    page_merger.write("merged.pdf")
    page_merger.close()Merge_simple(['1.pdf', '2.pdf'])
Page_Range_Merge(['1.pdf', '2.pdf'], 0, 2)def Page_Range_Merge(Pdfs, start, end):
    PDF_merger = PdfFileMerger()
    for pdf in Pdfs:
        PDF_merger.append(pdf, pages=(start, end))
    PDF_merger.write("merged.pdf")
    PDF_merger.close()Merge_simple(['1.pdf', '2.pdf'])
Page_Range_Merge(['1.pdf', '2.pdf'], 0, 2)
Parsing and Writing CSV
CSV is a common format for storing data but do you know you can programmatically store data in CSV using Python? Well, that's right this automation script will show you how to do it. Below you can find the script that uses the built-in CSV module.
# Parsing CSVimport csv# Parse the csv file
with open('data.csv', 'r') as csvfile:
    reader = csv.reader(csvfile)
    for row in reader:
        print(row[0])# Writing to CSV File
headers = ['Name', 'Age', 'Country']
data = [['John', 'Doe', 42], ['Jane', 'Doe', 37]]with open('data.csv', 'a', newline='') as csvfile:
    writer = csv.writer(csvfile, delimiter=',')
    writer.writerow(headers)
    writer.writerows(data)
Extract Email and Phone
Need assistance in extracting email and phone from Raw data. Well, this automation script will help you with it. This script uses the Re module which is a Regex module and the below functions will help you find the email and phone from raw or big text data by matching some patterns.
A most handy script for programmers when we need to find Emails and Phones from big data.
- Use the script in your Project
- Extract Complex Email Patterns
- Extract Complex Phone Patterns
- Much more
# Extract Email and Phonenumbersimport re# Extract Emails
def extract_email(text):
emails = re.findall(r'[\w\.-]+@[\w\.-]+', text)
return emails# Extract Phone Numbers
def extract_phone(text):
phone_numbers = re.findall(r'^[\+]?[(]?[0-9]{3}[)]?[-\s\.]?[0-9]{3}[-\s\.]? [0-9]{4,6}$', text)
return phone_numbers
Docx Text Extraction
This simple automation script will help you extract text from your Docx files. This script uses the Python-Docx module which allows you to extract the whole text from your Docx.
Handy script when you had multiple Docx files or need in a project where you are extracting text.
# Read Docx Files
# pip install python-docximport docx as docdef Read_Docx(filename):
    doc = doc.Document(filename)
    text = []
    for para in doc.paragraphs:
        text.append(para.text)
    return textRead_Docx('test.docx')
Web Automation
Want to automate your website or web app but don’t know how to do it? Then this automation script has a solution for you. Below you will find the script in which I mention how you can automate a webapp or webpage like a real human.
# Web Automation
# pip install playwrightfrom playwright.sync_api import sync_playwrightwith sync_playwright() as web:
driver = web.chromium.launch()
web_page = driver.new_page() # Navigate to the URL
web_page.goto('https://www.example.com/') # Select with Text selector
web_page.locator("text=login").click() # Select with Css Selector
web_page.locator("#nav-bar").click() # Select with Xpath
web_page.locator("//*[@id='btn']").click() # Do Text Input
web_page.locator("#input").fill("Parse") # Type Text
web_page.locator("#input").type("Good one") # Mouse Clicks
web_page.locator("#btn").click() # Double Click
web_page.locator("#btn").dblclick() # Right Click
web_page.locator("#btn").click(button="right") # Hower to Element
web_page.locator("#btn").hover() # Keys Command
web_page.locator("#btn").press("Enter") # Upload files to element
web_page.locator("#upload").set_input_files("test.png") # Focus on the Element
web_page.locator("#btn").focus() # Wait for the Element to be visible
web_page.wait_for_selector("#btn") # Execute JS Script
web_page.evaluate("document.getElementById('btn').click()" )
automation. So without any further delay let's straight jump into it.
Fetch Netflix
Need to fetch data of your favorite movie or TV Show on Netflix then give a try this Automation script that will scrap any Netflix show or movie data like its Genre, Name, Screenshots, Plot, and whole Metadata.
The script uses a Netflix module that is specially designed to fetch Netflix movie's plots and names to find a decent movie for your weekend.
- Use the script in your Project
- Find a Plot you love
- Find a Movie or Show to watch this weekend
- Extract Netflix Database
- Much more
#Netflix with Python
# pip install netfliximport netflix# search movie by ID
movie = netflix.Movie('70305903')
print(movie.name)
print(movie.genre)
print(movie.description)
print(movie.image_url)# Get MetaData of Movie
meta = movie.metadata
print(meta)# Search TV Shows by ID
show = netflix.TVShow('70305903')
print(show.name)
print(show.genre)
print(show.description)
Voice Shutdown
Do you ever wish you should have an AI assistant that shutdown your PC for you rather than you perform some mouse clicks? Well, this automation script will be your Voice shutdown assistant.
The script uses the Speech Recognition technique to listen to your voice and convert it to text and then use the OS module to shut down your computer.
# Voice Shutdown
# pip install SpeechRecognition
# pip install pyttsx3import pyttsx3
import speech_recognition as sr
import os
import timedef Listening():
    l = sr.Recognizer()
    with sr.Microphone() as source:
        print("Speak Sir I'm Listening")
        l.pause_threshold = 0.8
        voice = l.listen(source)
        try:
            print("Recognizing")
            q = l.recognize_google(voice)
        except:
            return None
    return qif __name__ == "__main__":
    engine = pyttsx3.init()
    while True:
        command = Listening()
        if "shutdown" in command:
            engine.say("PC going to shutdown")
            engine.runAndWait()
            os.system("shutdown /s /t 30")
            break
Automate GSheet
We had learned from previous articles how we can automate Excel but now let our hands on automating the Google Sheets by using Python. The below will show you how you can connect to your Gsheet and Read and Write the Data.
I coded the step-by-step guide in the below code so you can easily use the script in your project or work. You can get your Auth from Google Developer Console for free.
- Working with Gsheet for Project
- Fetching Gsheet Data
- Much more
# Automate GoogleSheet
# pip install pygsheetsimport pygsheets as Gsgs = Gs.authorize()# Open Google Sheet
sheet = gs.open("test_sheet")
sh = sheet.sheet1# Fetch Sheet Data
data = sh.get_all_values()# Fetch Rows
rows = sh.get_rows()# Fetch Columns
cols = sh.get_cols()# Fetch Cells by num
cell = sh.cell(1, 1)# Fetch Cells by range
cells = sh.get_cells('A1:B2')# Fetch Cells by row
cells = sh.get_col(1)# Write to Specific Cell
sh.update_cell(1, 1, "Medium")# Update Sheet by range
sh.update_cells('A1:B2', ["Medium1", "Medium2"])# Write to Sheet
sh.append_row(["Medium1", "Medium2"])# Format text in cell
sh.cell("A1").set_text_format("bold", True)# Share the sheet with a user
sh.share("Cette adresse e-mail est protégée contre les robots spammeurs. Vous devez activer le JavaScript pour la visualiser. ")
Fetch HTML from Web
Need to fetch HTML source code from the Web then this automation script is for you, my friend. This script uses requests and a selenium module and it has two functions. One for the Fetching page from the Static web page and 2nd for the Dynamic web page.
- Use script in your Project
- Scrap HTML from Complex sites
- A handy script for Web Scrapers
- Much More
# Fetch HTML with Python
# pip install requests
# pip install seleniumimport requests as req
from selenium import webdriverdef Fetch_Static():
    r= req.get("https://www.example.com")
    if r.status_code == 200:
        return r.textdef Fetch_Dynamic():
    browser = webdriver.Chrome()
    browser.get("https://www.example.com")
    return browser.page_source
Parse JSON
JSON is the most lightweight format for storing data and you can Parse JSON easily by using the below script in which I coded common functionalities you need in Parsing JSON.
- Parse JSON for a Project
- Write and Edit JSON
- Much more
# Parse JSONimport json
import requests# Parse Json from URL
url = "https://www.example.com/api"
response = requests.get(url)
data = response.json()# Load Json File
with open('example.json') as json_file:
    json_data = json.load(json_file)test = {"product": "test",
        "price": "10.00",
        "quantity": "1"}# Find Price
price = test["price"]# Write to Json File
with open('example.json', 'w') as out:
    json.dump(test, out)# Write Json with Format
with open('example.json', 'w') as out:
    json.dump(test, out, indent=4)
Strong Password Generator
Tired of thinking of a Strong Password for your Privacy. Then this script will generate a strong password for you. This script uses a Password generator module which you can modify by setting num of chars and numbers you want or duplicates etc.
# Password Generator
# pip install random-password-generatorfrom password_generator import PasswordGeneratorpwd = PasswordGenerator()# Set Strenghtpwd.maxlen = 10
pwd.minlen = 8
pwd.minlchars = 3
pwd.minnumbers = 1# Set Lenght of Duplicates in Password
pwd.non_duplicate_password(10)# Exclude Characters
pwd.excludeuchars = "ADG"
pwd.excludenumbers = "245"
pwd.excludeschars = "%$"# Generate Password
pwd.generate()
Watermark Your Images
Having a lot of Photos to watermark then try this Python Script that uses the Pillow module. The script is very handy to protect your photos by watermarking them.
# Watermark your Photo
# pip install pillowfrom PIL import Image
from PIL import ImageDraw
from PIL import ImageFont
import randomdef Image_Watermarker(filename, text):
image = Image.open(filename)
image = image.convert("RGBA")
w, h = image.size
y_axis=200
Fill = (255, 255, 255, 75)
s = Image.new('RGBA', image.size, (255,255,255,0))
font = ImageFont.truetype("Helvetica.ttf", 20)
mark = ImageDraw.Draw(s)
for tmp in range(10):
rnd = random.randint(0,100)
x_axis=random.randint(0, w - 300)
y_axis+=random.randrange(0, int(h / 8), 19) + rnd
mark.text((x_axis, y_axis), text, fill=Fill, font=font)
process= Image.alpha_composite(image, s)
process.save("image_watermark.png")Image_Watermarker("image. png", "Medium")
Get Disposable Email
Did you need Disposable Emails for your work? Well, Python has a solution for you by using the below script you can generate a temporary email in which you can receive emails and files.
# Get Disposable Email
# pip installfrom tempMail2 import TempMailtmp = TempMail()# Create New Disposable Email
email = tmp.get_email_address()# read mails
mails = tmp.get_mailbox(email)
print(mails)# Login and Get mails
tmp = TempMail(login="", domain="")
mails = tmp.get_mailbox()
print(mails)
Video Cropper
Crop your video without any limitation by using the below automation script. This script again uses Moviepy which is an awesome module for Video processing. In the script, I also mention how you can make crops by inputting the X and Y coordinate.
- Handy Tool for Video Editor
- Programatically Video Cropping
- You can use it in your Projects
- Bulk Cropping
- Much more
# Crop Video
# pip install moviepyfrom moviepy.editor import *# x1, y1 is the top left corner of the crop
# x2, y2 is the bottom right corner of the cropfilename = 'test.mp4'
clip = VideoFileClip(filename)
clip = clip.crop(x1=250, y1=150, x2=clip.width, y2=clip.height)
clip.write_videofile("test_crop.mp4")
Video To Audio
No need to download highly paid mp3 converters to convert your video to audio which you can do it with Python too. This script uses an awesome module name Moviepy that will convert any video format to any audio format.
- Use Script for your Project
- Bulk Video Conversion
- Convert a Big to Audio Fast
- Much more
# Video To Audio
# pip install moviepyimport moviepy.editor as moviedef Video_To_Audio(video_path):
    clip = movie.VideoFileClip(video_path)
    clip.audio.write_audiofile("audio.mp3")
    clip.audio.reader.close_proc()
    clip.close()
    print("Video To Audio Done")Video_To_Audio("video.mp4")
Parse PDF
Need some help in Parsing your PDF files then try this automation script that uses one of my most favorite Pdfminer modules. Below mention code has everything you need to start parsing your PDF.
Handy for a programmer who wants to extract text, the layout of PDF, and much more. Feel free to use the script in your project.
# Parse PDF
# pip install pdfminer.sixfrom io import StringIO
from pdfminer.pdfpage import PDFPage
from pdfminer.pdfparser import PDFParser
from pdfminer.converter import TextConverter
from pdfminer.pdfinterp import PDFResourceManager, PDFPageInterpreter
from pdfminer.layout import LAParams
from pdfminer.pdfdocument import PDFDocument
from pdfminer.high_level import extract_pages# TEXT EXTRACTION
text = StringIO()
with open('test.pdf', 'rb') as File:
    parser = PDFParser(File)
    pdf = PDFDocument(parser)
    pdfmanager = PDFResourceManager()
    extractor = TextConverter(pdfmanager, text, laparams=LAParams())
    i = PDFPageInterpreter(pdfmanager, extractor)
    for p in PDFPage.create_pages(pdf):
        i.process_page(p)
print(text.getvalue())
# EXTRACT PAGE LAYOUT
for p_layout in extract_pages("mydata.pdf"):
    for e in p_layout:
        print(e)
👉 Instagram Bot
Need to automate Instagram but know how to start then here is your automation script for making an Instagram bot by using the Instabot module. The script below has the functions that you will need to make a full-fledge instabot.
Note: It's a complete code package for those who need assistance making an Instagram bot.
# Instagram Bot
# pip install instabotfrom instabot import Botinsta = Bot()
insta.login(username="your_username", password="your_password")# Get user followers
insta.get_user_followers("username")# Get user following
insta.get_user_following("username")# Like a Post
insta.like("post_id")# Unlike a Post
insta.unlike("post_id")# Like Posts with hashtag
insta.like_hashtag("hashtag", amount=10)# Comment on a Post
insta.comment("post_id", "comment_text")# Comment Hashtag
insta.comment_hashtag("hashtag", "comment_text", amount=10)# Follow User
insta.follow("username")# Follow multiple users
insta.follow(["username1", "username2"])# Unfollow User
insta.unfollow("username")# Unfollow non follower users
insta.unfollow_non_followers(n_to_unfollows=10)# Upload Photo
insta.upload_photo("path_to_photo", caption="caption_text")# Upload Video
insta.upload_video("path_to_video", caption="caption_text")# Download Photo
insta.download_photo("photo_id", "path_to_save")# Send Message
insta.send_message("username", "message_text")
👉 Compress and Decompress Files
Need to compress your files to lower their sizes then here is the automation script that will help you to compress and decompress files on your computer. The script uses the Zip file Python built-in module. Probably a handy script when you have a lot of files to compress and decompress (extract zip).
# Compress and Decompress Filesimport zipfile as zipfdef Compress_Files(file):
    with zipf.ZipFile('data.zip', 'w') as compress:
        compress.write('data.csv', compress_type=zipf.ZIP_DEFLATED)def Decompress_Files(file):
    with zipf.ZipFile('data.pdf', 'r') as decompress:
        decompress.extractall('data.csv')Compress_Files('data.csv')
Decompress_Files('data.zip')
👉 Scan QRcode
This simple script will let you Scan QRcode and extract or print the data. It's an amazing script when you have a lot of QR codes and you want to extract data from them.
# Scan Qrcode
# pip install pyzbar
# pip install pillowfrom PIL import Image
import pyzbar.pyzbar as scanimg = Image.open('qrcode.png')
qr = scan.decode(img)[0]data = qr.data.decode('utf-8')
print("QRCODE: ", data)
👉 Python URL Shortner
Python can also help you to shorter your URL and this automation script will show you how they do it. The Script uses the Pyshortener module which will help you to shorter your URL using TinyURL API.
It's a handy script when you have a lot of URLs and you want to shorter them.
# Python Url Shortner
# pip install pyshortenersimport pyshorteners as shrturl = input("Enter a URL: ")
short_url = shrt.Shortener().tinyurl.short(url)print("Shortern URL: " + short_url)
👉 Python Grammarly
You guys probably use Grammarly and it's amazing but do you know you can create your own Grammarly tool in Python. Well, I present to you the automation script for creating a Proofreading program in Python using the Gramformer module.
In the below script you can see you can pass multiple sentences and the script will correct spelling mistakes and grammar mistakes.
# Python Grammarly
# pip install pip install -U git+https://github.com/PrithivirajDamodaran/Gramformer.gitfrom gramformer import Gramformergrammer = Gramformer(models = 1, use_gpu=False)sentences = ['The smell of fliwers', 'We is on the supermarket']# Check Grammer
for phrase in sentences:
    correction = grammer.correct(phrase)
    print("{} -> {}".format(phrase, correction))# Output
# The smell of fliwers -> The smell of blossoms
# We is on the supermarket -> We are at the supermarket
👉 Read and Modify EXIF
Want to Edit EXIF metadata of Photos programmatically then this automation script is for you. The script uses the most famous Exif Module and the below script has important function like reading, update, and update tags.
# Read and Modify Exif of Photos
# pip install exiffrom exif import Image as img# READ EXIFwith open('img.png', 'rb') as f:
    tags = img(f)# Sorted list of exif
exif_list = sorted(tags.list_all())
print(exif_list)# Print Individual Exif
for tag in exif_list:
    print(f"{tag}: ", tags[tag])# MODIFY EXIF# add new tag
img.copywrite = '2020'# Update tag
tags['copywrite'] = '2022'
tags['make'] = 'Canon'# Delete tag
img.delete('copywrite')
img.delete('make')# Save the modified exif
with open('img.png', 'wb') as f:
    f.write(img.get_file())
👉 Search with Regex
Searching for a pattern or finding a substring with Regular Expression is always difficult but it's also useful too. So this automation script will let you a hand by showing how to use regular expressions to automate the Regex searches.
The below mention script has everything you need to get your hand straight on Regular Expression.
# Search with Regreximport re as regex# Regex for Email Address
regex.findall(r'[\w.+-]+@[\w-]+\.[\w.-]+', "hell this isCette adresse e-mail est protégée contre les robots spammeurs. Vous devez activer le JavaScript pour la visualiser. ")# Regex for Phone Number
regex.findall(r'\d{3}-\d{3}-\d{4}', "phno 123-456-7890 medium 234-234")# Regex for URL
regex.findall(r'https?://(?:[-\w.]|(?:%[\da-fA-F]{2}))+', "test12testhttps://medium.com")# Regex for IP Address
regex.findall(r'\d{1,3}\.\d{1,3}\.\d{1,3}\.\d{1,3}', "ip address is 192.013.242.2")# Regex for Discord username
regex.findall(r'[\w.+-]+#\d{4}', "hi python to medium23#2134")# Regex for hashtag
regex.findall(r'#\w+', "this is a test #test")# Regex for username
regex.findall(r'@\w+', "this is a test @test")# Regex for Pattern matching
regex.findall(r'\bmedium\b', "this is a test medium")
👉 IP Address Locator
This automation script uses Geocoder Module that will help you to locate any IP address even yours. This is an awesome automation script for locating Ip address, city of Ip address, Area info and etc.
# Ip Address Locator
# pip install geocoderimport geocoder as geo# Get your Own IP Address
ip_address = geo.ip('me')
print(ip_address)# Find City of IP
ip = geo.ip('192.xxx.xxx.x')
print(ip.city)# Get latitude and longitude of IP Address
print(ip.latlng)# Get Area Info
info = geo.google('San Francisco')
print(info.geojson)
print(info.osm)
print(info.wkt)
👉 Photoshop with Python
Photoshop is one of the most famous software from Adobe for editing your photos but do you know you can automate Photoshop with Python too?. Well, this cool automation script will show you how to do it. Below I mention functions you need to get started with Photoshop automation.
Note: For more guides, you can check the Photoshop API documentation
# Photoshop with Python
# pip install photoshop-python-apiimport photoshop.api as ps
from photoshop.api import Session# Run Photoshop Actions
with Session() as p:
    p.app.doAction(action = "testAction")# Simple Text on Page
app = ps.Application()
doc = app.documents.add()
color = ps.SolidColor()
new_layer = doc.artLayers.add()
new_layer.textItem.contents = "Hello from Medium"
new_layer.textItem.position = (100, 100)
new_layer.textItem.color = color# Change Color of Fore and background
with Session() as p:
    foreground = ps.SolidColor()
    foreground.rgb.red = 1
    foreground.rgb.green = 0
    foreground.rgb.blue = 0
    ps.app.foregroundColor = foregroundbackground = ps.SolidColor()
    background.rgb.red = 0
    background.rgb.green = 0
    background.rgb.blue = 1
    ps.app.backgroundColor = background# Croping an Image
with Session(action="new_document") as p:
    p.active_document.crop(bounds=[120, 23, 453, 342], width=1920, height=1080)# Import Image in Layer
with Session(action="new_document") as p:
    run = p.ActionDescriptor
    run.putPath(ps.app.charIDToTypeID("null"), "img.png")
    event = p.app.charIDToTypeID("Plc ")
    p.app.executeAction(p.app.charIDToTypeID("Plc "), run)
👉 Final
e. In this article, I will show you 10 Python scripts for automating your boring stuff. so mark this article and let's get started.
Fetch Emails
Want to fetch emails from your email services like Gmail, Outlook, or any? Then this automation will be your savior. This script uses the Imap-tool module that connects and log-in with your email server and fetches all unread emails.
# Fetch Outlook Emails
# pip install imap-toolsfrom imap_tools import MailBox as Email
from imap_tools import MailMessageFlags# Fetch all unseen mails
with Email("imap.outlook.com").login("email", "pass", "INBOX") as EmailBox:
    mails = [m.mail for m in EmailBox.fetch(mark_seen=False)]
    EmailBox.flag(mails, MailMessageFlags.SEEN, True)
    for email in mails:
        print("From : {}".format(email.from_))
        print("Subject:", email.subject)
        print("Body:", email.text)
Fetch PDF Tables
We have extracted text and images from PDF but you know we can also extract tables from PDF programmatically. The script uses the Camelot-py module which is a Pdf table extraction library.
Below you can find the coded functions for extracting and saving tables in different formats.
# Fetch Tables from PDF
# pip install camelot-pyimport camelot as table# Fetch All Tables
tables = table.read_pdf('test.pdf')
tables.export('test.csv', f='csv')# Fetch Specific Page Table
tables = table.read_pdf('test.pdf', pages='1')
tables.export('test.csv', f='csv')# Fetch and Print
tables = table.read_pdf('test.pdf')
for table in tables:
    print(table.parsing_report)# Save in Excel
tables.export('test.xlsx', f='xlsx')# Save in JSON
tables.export('test.json', f='json')
Reduce Photos Size
Make your Photos and images smaller in size without losing their Quality. This python script uses a pillow module that will reduce the size of your Image without losing any quality.
Below code will open a dialog box in which you can select the image file and make it compress.
# Reduce the Size of Image
# pip install Pillowfrom PIL import Image
from tkinter.filedialog import *def Reduce_Size():
    filename = askopenfilename(title='Choose an image file')
    image = Image.open(filename)
    w, h = image.size
    compress = image.resize((h, w), Image.ANTIALIAS)
    compress.save("compressed.png")Reduce_Size()
Track Instagram Followers
Keeping track of your Instagram followers is sometimes hard. Then why not track your followers programmatically and make it easier? This automation script uses the Instabot module that can track your followers 24/7 and notify you when someone follows you or unfollow by its name.
# Track Instagram Followers
# pip install instabotimport instabotinsta = instabot.Bot()# Login
user = "username"
pwd = "password"
insta.login(username=user, password=pwd)# Get Followers
Total_users = []
Total_followers = insta.get_user_followers(user)for u_id in Total_followers:
    Total_users.append(insta.get_username_from_user_id(u_id))# Track Followers
while True:
    followers = insta.get_user_followers(user)
    if len(followers) > len(Total_followers):
        for u_id in followers:
            username = insta.get_username_from_user_id(u_id)
            if username not in Total_users:
                print("You Gain new Follower: ", len(followers))
                print(f"{username} follow you")
                Total_followers = followers

    elif len(followers) < len(Total_followers):
        for u_id in followers:
            username = insta.get_username_from_user_id(u_id)
            if username not in Total_users:
                print("You Lose a Follower: ", len(followers))
                print(f"{username} unfollow you")
                Total_followers = followers
Website Blocker
Now you can block websites that you don’t want to visit. This script uses your etc/host which holds IP and Web addresses. So this script will simply edit the host file and forward the Website you want to block to another IP like 127.0.0.1.
# Website Blocker
# for linux/mac : etc/hostsites = ["www.example.com", "www.xyz.com"]
host = 'C:\Windows\System32\drivers\etc\hosts'
redirect = "127.0.0.1"def Website_Blocker():
    with open(host, 'r+') as file:
        content = file.read()
        for site in sites:
            if site in content:
                pass
            else:
                file.write(redirect + " " + site + "\n")Website_Blocker()
Secure Your Files
Make your files more secure with this automation script. This script has a lock and unlocks a feature that will protect the privacy of your files. The script uses the PyAesCrypt module and below I coded the lock and unlock function that you are free to use.
- Handy automation script for locking multiple files programmatically with a key.
# Secure Your Files
# pip install pyAesCryptimport pyAesCrypt as secure
import os# Lock Your File
def lock_file(filename, pwd):
    f_name = filename.split('.')[0]
    secure.encryptFile(filename, f_name + ".aes", pwd)
    os.remove(filename)# Unlock Your File
def unlock_file(filename, pwd):
    f_name = filename.split('.')[0]
    secure.decryptFile(filename, f_name + ".txt", pwd)
    os.remove(filename)lock_file("data.txt", "pass")
unlock_file("data.aes", "pass")
Audio To Text
This Python script will make it easier for you to convert your Audio files to Text. The script is very handy for generating Subtitles by just passing the audio version of the video and using Speech recognition it will generate subtitles or a text version of the audio.
# Audio File to Text
# pip install SpeechRecognitionimport speech_recognition as srdef audio_to_text(audio_file):
    bot = sr.Recognizer()
    with sr.AudioFile(audio_file) as s:
        audio = bot.record(s)
        try:
            text = bot.recognize_google(audio)
            return text
        except Exception as e:
            print(e)
            return "Error"audio_to_text("test.wav")
Python Webapp with Django
Now you can build your webapp with Python using the Django module. This awesome script will guide you step by step on how to create your first Django app project. You can explore more to know how you can make a decent webapp with Django.
# Build Web App with Python
# pip install django# Step 1: Create the django project
django-admin startproject medium_app# Step 2: Create the django app
python manage.py startapp app# step 3: Specify the app name in settings.py
INSTALLED_APPS = [
    'django.contrib.admin',
    'django.contrib.auth',
    'django.contrib.contenttypes',
    'django.contrib.sessions',
    'django.contrib.messages',
    'django.contrib.staticfiles',
    'medium_app',
]# step 4: Edit the Views.py in app folder
from django.http import HttpResponsedef index(request):
    return HttpResponse("Hello from medium")

# step 5: Create new urls.py in app folder
from django.urls import path
from .views import index
urlpatterns = [
    path('', index)
]# step 6: Edit urls.py in medium_app folder
from django.contrib import admin
from django.urls import path, includeurlpatterns = [
    path('admin/', admin.site.urls),
    path('', include('app.urls')),
]# step 7: Run the server
python manage.py runserver
Python Task Scheduler
Easily schedule your Python task by using this automation script. Below I mention three function and scheduling methods that can run the task on a specific time, day, or date.
# Schedule Task
# pip install schedulefrom re import L
import schedule# func 1
def best_luck():
print("Best of Luck for Interview")# func2
def Read():
print("Don't forget to Read Article")# func3
def Motivation():
print("Work smarter not harder")schedule.every().seconds.do(Motivation)schedule .every(5).minute.do( Motivation)schedule.every(). hour.do(Read)schedule.every(). thursday.do(best_luck)schedule .every().day.at("11:00").do( Read)while True:
schedule.run_pending()
Store Password
Want to keep your password secure then this automation script will help you do so. This script uses Bcrypt which creates a hash of your password, below I mention the code for hashing and decoding the password.
# Storing Passwords
# pip install bcryptimport bcryptdef hash_password(password):
    return bcrypt.hashpw(password.encode('utf-8'), bcrypt.gensalt())def decode_password(password, hashed_password):
    return bcrypt.checkpw(password.encode('utf-8'), hashed_password)hash_pwd = hash_password('password')
decode_password('password', hash_pwd)
50+ Exciting Industry Projects to become a Full-Stack Data Scientist 
Web scraping with PyScrappy

.png)
Image source: Author
Introduction
These days Data Science professionals are expected to have some background and experience in ‘Web Scraping.’ This technique involves gathering relevant data from one or more web pages or websites using a tool like Selenium. To build a web scraper, one needs expertise in Selenium and Python coding, commonly used for this purpose.
Quite a few software vendors provide such web scraping services through their high-end tools. However, a few open-source libraries allow web scraping with 1-2 lines of code. These are perfect for research and educational purposes.
This article will explore a recently introduced web scraping & PyScrappy. It is an excellent Python library for collecting data from e-commerce, social media, images, songs, news, and many more. Follow along the steps in this article to quickly learn web scraping from different websites using PyScrappy.
Introduction to Web Scraping & PyScrappy
Web scraping is an efficient and effective technique to address the need for a dataset when no relevant data is available for model building. Data Scientists often scrape a certain amount of data from different websites using one or a combination of Python libraries like Requests, Beautiful Soup, Selenium, Scrapy, Ixml, etc., to build a dataset for their machine learning/ deep learning models. The web scraping technique solves the scarcity of data and enables these data professionals to exercise greater control in building the dataset by selecting only relevant attributes.
PyScrappy is another open-source and flexible python package for data scraping similar to those mentioned above. It enables users to scrape data from different sources quickly. These are some of the features of PyScrappy:

Master 12+ Cutting Edge Tools
Industry experts teach you all the latest tools and languagesLearn More- Can easily scrape data available on the internet and return the scraped data as a Data Frame
- Requires only a few inputs from the user and performs automatic data scraping
- Is a powerful library as its multiple scrapers work with different websites to scrape data for education and research purposes
PyScrappy offers eight different scrapers for scraping the required data conveniently from various sources. These other scrapers are:
- Ecommerce Scrapper
- Social Media Scrapper
- Food Scrapper
- News Scrapper
- Wikipedia Scrapper
- Stock Scrapper
- Song Scrapper
- Image Scrapper
PyScrappy requires Python >= 3.6. You can find the source code hosted on GitHub. For the latest version, binary installers can be downloaded from PyPi, and the documentation for PyScrappy is available here.
Let us begin our scraping tutorial by installing the PyScrappy library using the pip command.
pip install PyScrappy
This tutorial takes you through four types of web scrapers (Ecommerce, Wikipedia, Social Media, and News scrappers) as provided by PyScrappy. Please note that these web scrapers will work well when you run the code on a local instance of a jupyter notebook instead of a colab notebook or a Kaggle notebook.
After installing the library, first, we have to import the package using the ‘import’ command.
import PyScrappy as ps
-
Ecommerce Scrapper:
Using this e-commerce scraper, we create a PyScrappy library instance that interacts with the ‘ECommerceScrapper’ class. With this scraper, we can easily scrape data from different E-Commerce websites such as Alibaba, Flipkart, and Snapdeal.
For scraping the e-commerce data, we create an object of this class by using the following command-
obj = ps.ECommerceScrapper()
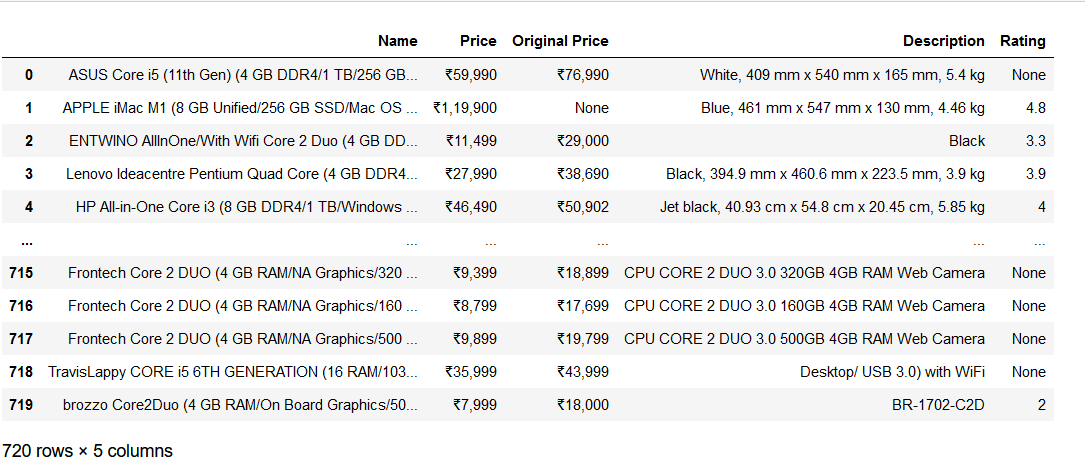
For example, I want to get a new Desktop PC from Flipkart and a nice set of headphones from Snapdeal. So, when I search the keyword ‘PC’ on Flipkart, I get a few hundred results. Filtering options of ‘Popularity,’ ‘Price,’ ‘Featured,’ and ‘Date added’ and the side panel category options (RAM, Storage, Color, CPU, Monitor display size, etc.) on the search results page can help in sorting the results. However, scrolling through multiple pages is quite tedious. So, I can use the Flipkart Ecommerce scraper to help me choose the best product by storing different attributes like name, prices (selling price and original price), description, and rating of all the products. The values of these attributes are stored in a single DataFrame, and there is no need to browse the individual pages of any product. This way, I can see all the results in one single sheet with all the specifications/attributes, which will enable me to make an informed purchase decision.
Let us see how the Pyscrappy Ecommerce scraper works. The syntax for it is –
obj.flipkart_scrapper (‘product_name’, n_pages)
I will search for a Desktop PC by entering ‘product_name’ as ‘PC’ and the number of pages to 18 (i.e., the number of pages that showed up after the keyword search on the website), and I wanted to scrape all the results. It might be different in your case depending on the time and location of the search in the following format. Also, please remember to be nice to the servers when requesting for scraping the data, i.e., do not scrape too much data in a short time.
obj.flipkart_scrapper (‘PC’, 18)
Similarly, for the Headphones search on Snapdeal, I will use the snapdeal_scrapper. It will help to scrape the required data from the Snapdeal website with categories such as Name, Price, Original Price, and Number of Ratings of the desired product. After searching for the keyword ‘headphones,’ there are five search results pages. The syntax for this is
obj.snapdeal_scrapper (‘product_name’, n_pages)
So, I will enter ‘headphones’ as my desired product and the number of pages to ‘5’ in the following format.
obj.snapdeal_scrapper (‘headphones’, 5)
Here is what the scraped data from Flipkart looks like:
Here is what the scraped data from Snapdeal looks like:

2. Social Media Scrapper:
Similar to the previous scraper, the Social Media scraper creates a PyScrappy library instance to interact with the class SocialMediaScrapper. With this scraper, it is possible to scrape data from three social media sites like Instagram, Twitter, and YouTube. For this particular scraper, I will demonstrate the use of the YouTube Scrapper. For scraping social media data, again, we start with creating an object of this class,
obj = ps.SocialMediaScrapper()
YouTube Scrapper:
With this YouTube Scraper, we can scrape YouTube data attributes like the ‘Title of the video,’ ‘URL of the Video,’ ‘Number of Views’ the video has got, the number of days after the release.
For example, say I want to get a complete list of videos from Analytics Vidhya’s YouTube channel. So, I will enter the URL of the YouTube channel videos section and the number of pages in the following format.
obj.youtube_scrapper(‘url_of_video_sec’, n_pages)
Note that it is possible to scrape as many pages as you want for the YouTube scrapper. But ensure that the channel URL is valid and ending with ‘videos’ as the URL only from the video section will work. I am only scraping the first two pages for demonstration purposes.
df=obj.youtube_scrapper('https://www.youtube.com/c/Analyticsvidhya/videos', 2)
Here is what the DataFrame looks like:
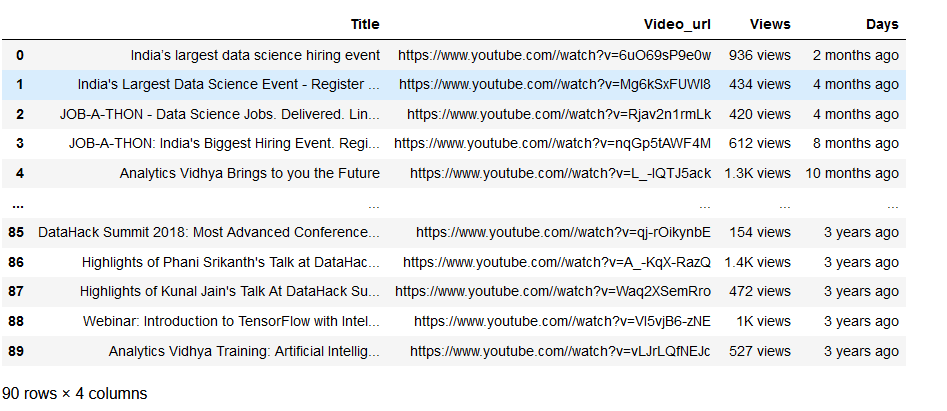
Similarly, you can use the Twitter scraper for a particular Twitter handle and gather the information that helps to scrape data from Twitter-like Name, Twitter Handle, Post Time, Tweet, Reply Count, Retweet Count, and Like Count. Additionally, the Instagram Scraper helps scrape Instagram data like name, posts, followers, following, bio and captions. For correct scraping, it is important that the Instagram account is public. Also, Instagram might request a login after a certain number of runs for continuing the task.
iii) News Scrapper:
Using the News Scraper, we can create an instance of the PyScrappy library to interact with the class NewsScrapper. It helps in scraping News data, i.e., Headlines, Time, Date, and news, from www.inshorts.com. To scrape the data, we need to enter the genre and number of pages in the following format.
obj.news_scrapper(‘genre’, n_pages)
We can enter any one keyword for genres from accepted values like the world, national, business, sports, politics, technology, entertainment, etc. More information is available on the PyScrappy website.
Let us try scraping the website for ‘world’ news. We use the following command-
obj.news_scrapper(1, 'world')
The scraped data from the website appears as below-
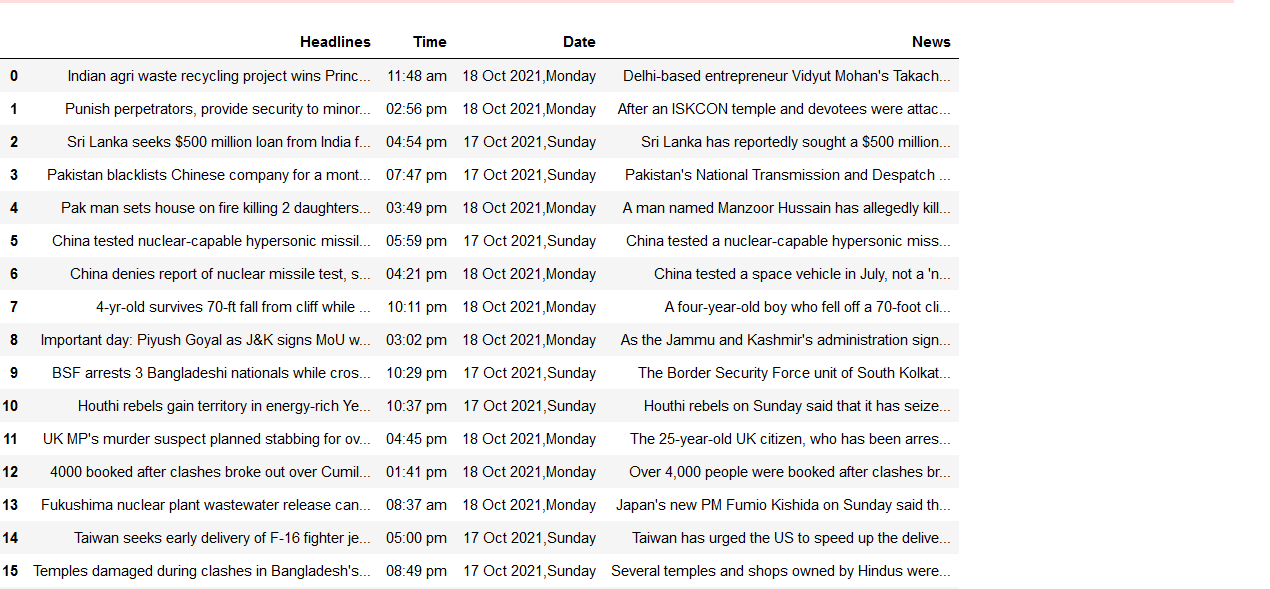
iv) WikipediaScrapper:
This scraper for Wikipedia creates a PyScrappy library instance which interacts with the class WikipediaScrapper and helps in scraping text data from Wikipedia. Here we can scrape data in three formats: paragraph, header, and text. For scraping Wikipedia data, first, we need to create an object of this class.
obj = ps.WikipediaScrapper()
para_scrapper():
Next, if we want to scrape an entire paragraph, we use the para_scrapper command. We have to enter the keyword for which we intend to scrape the data from Wikipedia in the following format.
obj.para_scrapper('keyword')
Let us use the scraper for the keyword’ machine learning’.
obj.para_scrapper('machine learning')
Using the above command, we get the following paragraph.
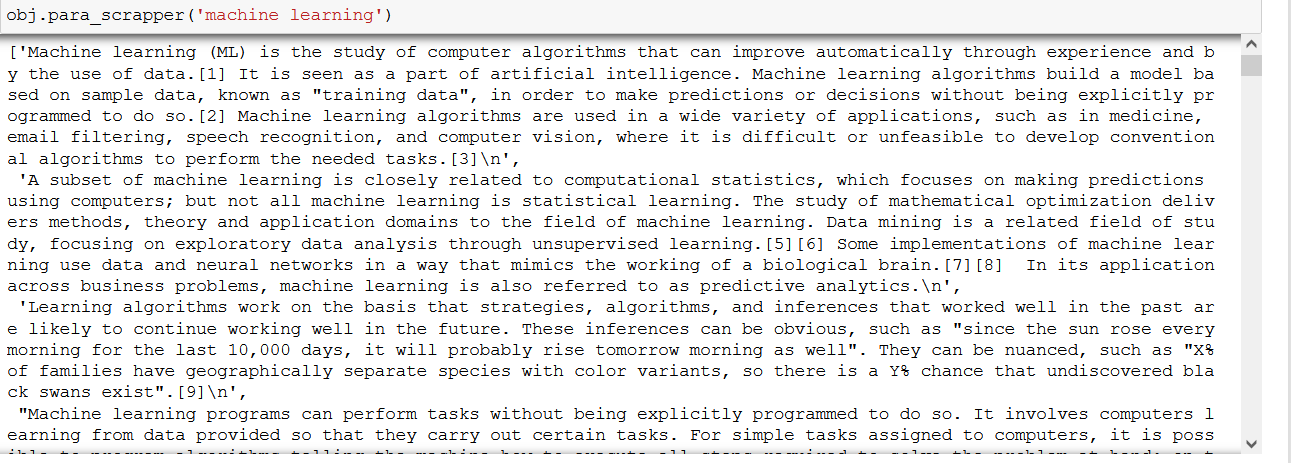
Similarly, we can scrape the header and text of the desired keyword. We only have to ensure that the desired keyword information is available on Wikipedia.
obj.header_scrapper('keyword')
obj.header_scrapper('machine learning')

obj.text_scrapper('keyword')
obj.text_scrapper('machine learning')
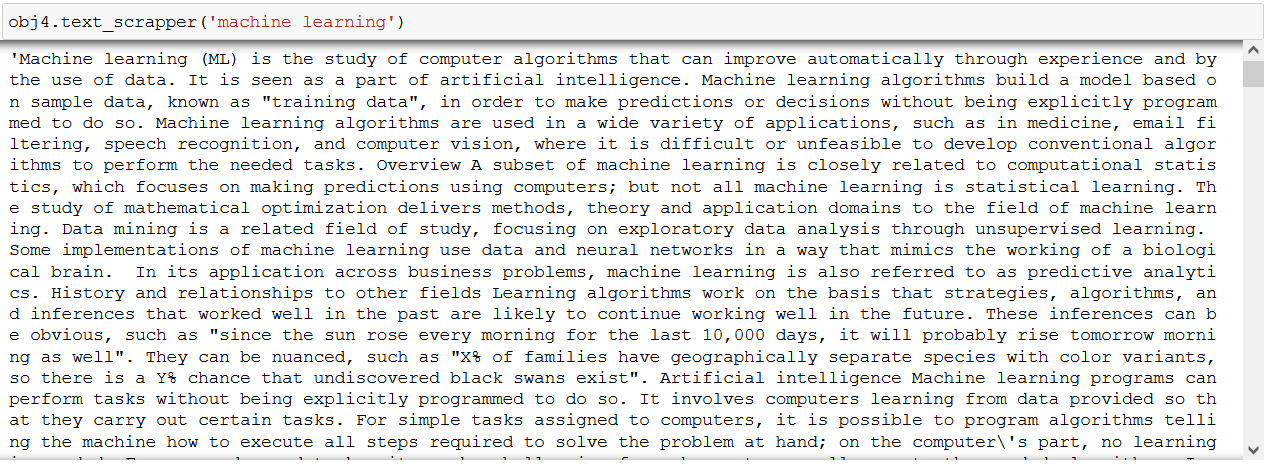
That’s it! Hope you liked my article on web scraping & PyScrappy.
EndNotes
We saw four different scrappers available with the PyScrappy library. It is definitely useful to scrape the required data for practicing and improving EDA/Machine Learning skills. You need a single line of code for data scraping and just two inputs for each scraper that we have tried. Even though this library is relatively new, it appears to be a promising tool in simplifying the data scraping process, thereby reducing the time required to gather the data for model building. So, go ahead and explore this library and the other scrapers not covered in this tutorial.
Until the next article, happy reading!
Read more articles on web scraping & PyScrappy here.
Python Scripts to Automate your everyday problems and task. Make a bookmark or put it in the list and let’s get started.
Fetch IMDB
You probably use IMDB for getting your best movie for a weekend but do you know you can scrap data from IMDB with Python. This automation script will let you automate the IMDb data scraping in a Pythonic way. Below I coded the standard function you can use.
- You can use it for your IMDB Project
- Scrap and Analyze Movies Data
- Finding the Best movie for your Weekend
- And much more
# IMDB
# pip install imdbpyimport imdbia = imdb.IMDb()# Search for a movie.
search_result = ia.search_movie('The Matrix')# Get the ID of the movie.
movie_id = search_result[0].movieID# Get the movie from ID
movie = ia.get_movie(movie_id)# Get Rating of movie
rating = movie['rating']# Get Plot of movie
plot = movie['plot']# Get Genre of movie
genre = movie['genres']# Get Box office of movie
box_office = movie['box office']# Get Cast of movie
cast = movie['cast']# Get Director of movie
director = movie['director']# Get Writer of movie
writer = movie['writer']# Search for a person.
search_result = ia.search_person('Keanu Reeves')
Email Fetcher
You have seen the Email sending script in my previous articles but not only sending you can fetch the Email too. This automation script will be your handy tool for fetching emails from Gmail, Outlook, or any mail server. Check the below code.
- Extract E-mails for a Project
- Extract emails from Inbox
- Much more
# Fetch Emails
# pip install imap-toolsfrom imap_tools import MailBoxdef Fetch_Email(user, pwd):
    mbox = MailBox('imap.mail.com').login(user, pwd, "INBOX")
    for email in mbox.fetch():
        print(email.date, email.subject, len(email.text or email.html))

Fetch_Email("user", "pass")
Analyze Stock Market
Analyze the Stock market in a Pythonic way by using this automation script. This script uses the YFinancey module that programmatically extracts the stock market information and data for you. You can select multiple stocks, analyze data make charts and graphs, and much more.
- Get Multiple Stocks market
- Track daily market
- Script for your Project
- Script for Creating a market graph
- much more
# Analyse Stock market
# pip install yfinanceimport yfinance as yfmarket = yf.Ticker("MSFT")# Get stockmarket info
info = market.info
print(info)# Fetch historical data
historical = market.history(period="1y")
print(historical)# get actions
actions = market.actions
print(actions)# get dividends
dividends = market.dividends
print(dividends)# get splits
splits = market.splits
print(splits)# get balance sheet
balance_sheet = market.balance_sheet
print(balance_sheet)# get market news
market_news = market.news
print(market_news)# show earnings
earnings = market.earnings
print(earnings)# get recommendation
rec = market.recommendation
print(rec)# Get another Ticker
market1 = yf.Ticker("AAPL")
market2 = yf.Ticker("TSLA")
market3 = yf.Ticker("GOOG")# Fetch Market data from multiple tickers
market_data = yf.download("AAPL", "GOOG", start="2019-01-01", end="2019-12-31")
print(market_data)
PDF Watermark Remover
Need to remove Watermark from your PDF but don’t know how to do it. Then here is the automation script that uses the PyPDF4 module that will remove the Watermark from your PDF files.
You can use the script for removing watermarks for multiple PDF files by keeping the Quality the same.
# PDF Watermark remover
# pip install PyPDF4from PyPDF4 import PdfFileReader, PdfFileWriter
from PyPDF4.utils import b_ as io
from PyPDF4.pdf import ContentStream
from PyPDF4.generic import TextStringObject, NameObjectdef Watermark_Remover(target_text, pdf_file):
    with open(pdf_file, "rb") as f:
        pdf = PdfFileReader(f, "rb")
        out = PdfFileWriter()
        pages = pdf.getNumPages()
        for p in range(pages):
            page = pdf.getPage(p)
            content= page["/Contents"].getObject()
            content2= ContentStream(content, pdf)
            for op, oper in content2.operations:
                if oper == io("Tj"):
                    txt = op[0]
                    m = txt.startswith(target_text)
                    if isinstance(txt, str) and m:
                        op[0] = TextStringObject('')

            page.__setitem__(NameObject('/Contents'), content2)
            out.addPage(page)

        with open("out.pdf", "wb") as outStream:
            out.write(outStream)
target_text = 'Sample'
Watermark_Remover(target_text, "test.pdf")
Image Size Compressor
Script for my making your Images and Photo Sizer lower by keeping the Quality the same. This automation script uses the Pygeutzli module that compresses your Photos to lower their sizes.
This handy script can be used for many purposes.
- Compress Photos for a Project
- Bulk Photo Compressor
- Compressing for your App function
# Compress Photo Size
# pip install pyguetzliimport pyguetzlidef Compress(image):
    img = open(image, "rb").read()
    optimized= pyguetzli.process_jpeg_bytes(img, quality=80)
    output = open("optimized", "wb")
    output.write(optimized)Compress("test.jpg")
PDF Extracting
Extract Text, Images, and Tables from your PDF by using this automation script which uses three different modules. Below you can find the coded script that you are free to use.
- Bulk PDF Extraction
- Extracting Tables from PDF
- PDF extraction for Project
- Much more
# PDF Extracting with Python
# pip install textract
# pip install tabula-py
# pip install PyMupdfimport textract as extract
import tabula as tb
import fitzdef Extract_Text(pdf):
    pdf = extract.process('test.pdf')
    print("Text: ", pdf)def Extract_Photos(pdf):
    doc = fitz.open('test.pdf')
    i = 1
    for page in doc:
        for img in page.getImageList():
            xref = img[0]
            pix = page.getPixmap(xref)
            pix.writePNG(f'test_{i}.png')
            print("Image: ", pix)
            i += 1def Extract_Tables(pdf):
    table = tb.read_pdf('test.pdf', pages='all', multiple_tables=True)
    # save in csv
    tb.convert_into('test.pdf', 'test.csv', output_format='csv', pages='all')
    # save in excel
    tb.convert_into('test.pdf', 'test.xlsx', output_format='xlsx', pages='all')
PySimpleGui
Create an eye-catching and beautiful Gui with this script which uses the PySimpleGui module. This module is simpler and has the power for creating apps for anything in python.
- Creating Gui apps for your Project
- Creating an app for Graphs
- Creating an app for Machine learning
- Much more
# pip install PySimpleGUIimport PySimpleGUI as guilayout = []# Label Text
text = gui.Text('This is PysimpleGui', size=(30, 1))
layout.append([text])# Button
button = gui.Button('Click Me', target='_blank')
layout.append([button])# Input Box
input_box = gui.Input(key='-IN-')
layout.append([input_box])# Browse Folders
browse_folder = gui.FolderBrowse()
layout.append([browse_folder])# Set Image
image = gui.Image('img.png')
layout.append([image])# Radio Buttons
radio = gui.Radio('Radio', ['A', 'B', 'C'])
layout.append([radio])# Check Boxes
check = gui.Checkbox('Check', default=True)
layout.append([check])

# Set window
win = gui.Window('Window Title', layout, auto_size_text=True)

event, values = win.read()win.close()
Merge CSV Files
The simple Automation script will let you merge your multiple CSV files into one file. It will also help you clear the duplicates while merging.
# Merge CSV Files
# pip install pandasfrom pandas import read_csv
import pandas
import osdef Merge_Csv(files):
    df = pandas.concat(map(read_csv, files), ignore_index=True)
    df.to_csv("merged.csv", index=False)
    print("CSV has Been Merged...")Merge_Csv(["movies.csv", "movies2.csv", "movies3.csv"])
Automate Databases
Databases are the organized collection of your Data and we need them in our daily life. But we can organize and Fetch the database with python too. This script use MySql-connecter will help you to connect to your database and let you fetch or execute any SQL Query.
- Use the Script in your Project
- Script for Fetching Database
- Script for Updating Database
# Database with Python
# pip install mysql-connector-pythonimport mysql.connector# Connect to yout SQL database
sql = mysql.connector.connect(
    host="Your host",
    user="username",
    passwd="",
    database="mydatabase_1"
)# create table
cursor = sql.cursor()
cursor.execute("CREATE TABLE movies (title VARCHAR(255), rating VARCHAR(255))")# insert data
query = "INSERT INTO movies (title, rating) VALUES (%s, %s)"
value = ("The Matrix", "7.5")
cursor.execute(query, value)# Select Data
cursor.execute("SELECT * FROM movies")
myresult = cursor.fetchall()
for x in myresult:
    print(x)

# Delete Data
cursor.execute("DELETE FROM movies WHERE title = 'The Matrix'")# Get Specific Data
cursor.execute("SELECT * FROM movies WHERE title = 'The Matrix'")
myresult = cursor.fetchall()# Update Data
cursor.execute("UPDATE movies SET rating = '8' WHERE title = 'The Matrix'")# Delete Table
cursor.execute("DROP TABLE movies")# Close Connection
sql.close()
Reddit Bot
Reddit is an awesome social media platform but you know you can extract and create a bot for Reddit too in Python. This script is a simple explanation that will let you create a super Reddit bot by using the Praw module.
- Create a Reddit bot for Project
- Fetch Reddit data
- Bot tracking Subreddit
- Much more
# Reddit Bot
# pip install prawimport prawreddit = praw.Reddit(client_id='',
                    client_secret='',
                    user_agent='',
                    username='',
                    password='' )# Get the SubReddit
subreddit = reddit.subreddit('python')# Get the top 10 posts
for sub in subreddit.hot(limit=10):
    print(sub.title)# Get Info of a post
sub = subreddit.hot(limit=1)
print(sub.title)
print(sub.author)
print(sub.id)
print(sub.ups)
print(sub.downs)
print(sub.visited)# Get the comments of a post
for comment in sub.comments:
    print(comment.body)# Get Permalink of Comment
for comment in sub.comments:
    print(comment.permalink)# Get the replies of a comment
for comment in sub.comments:
    for reply in comment.replies:
        print(reply.body)# Get Score of a post
for sub in subreddit.hot(limit=1):
    print(sub.score)
1. Multiple Folder Creation
One of the dullest tasks I ever had at work was creating folders for each day/month of the year. These folders would contain important files, so they needed to be properly organized.
Something like this.
Although that looks simple, that might stop you from doing other productive tasks. Fortunately, we can automate folder creation using pathlib. I believe this library comes with Python, but if you don’t have it, just install it with pip.
The tricky part here is obtaining the name of the months. What some people do is create a list and manually type the names of the months from January to December.
That’s OK, but we could easily get the names of the month using the calendarmodule.
import calendarmonth_names = list(calendar.month_name[1:])
print(month_names)
Then, we have to manually write the days we want in a list (if you have to create folders for day 1 to day 31, save time creating them with a list comprehension)
days = ['Day 1', 'Day 8', 'Day 15', 'Day 22', 'Day 28']
Now, we can loop through each month/day of the year using the code below.
After running the code, a new “2022” folder will be created in your working directory. Inside you’ll see folders for each month and day of the year as shown in the screenshot above.
2. Extract Tables from PDFs
There’s a library called camelot that helps you extract tables from PDFs. It doesn’t always work smoothly, but there are ways to customize the extraction.
Before you install camelot, you might need to install libraries such as tk and Ghostscript (check the documentation for more details)
Once you have all the requirements, you can install camelot.
# pip
pip install camelot-py# conda
conda install -c conda-forge camelot-py
For this simple demonstration, I’m going to use this PDF available here that is named “foo.pdf” Download the file and save it in your working directory.
To read this PDF file, we can use the .read_pdf method
import camelottables = camelot.read_pdf('foo.pdf', pages='1', flavor='lattice')
print(tables)
If you print this, you’ll get the number of tables on page #1. In this case, there’s only one table. Also, keep in mind that you can customize the extraction with the flavor parameter. It’s set to lattice by default but you can set it to stream.
Now to extract the table from the PDF, we use the .export method, and then we can either print it as a dataframe or export it to a CSV file.
tables.export('foo.csv', f='csv', compress=True)tables[0].to_csv('foo.csv')  # to a csv file
print(tables[0].df)  # to a df
Great! If you export it to CSV, the file should be in your working directory.
3. Extract Tables from Websites
Most people don’t know that we can easily extract tables from websites using only Pandas (in case you don’t have Pandas, install it with pip: pip install pandas)
Say you want to extract tables from Wikipedia. You can do that in seconds using the .read_html method. The code below helps me extract all the tables listed in this Simpsons post on Wikipedia.
import pandas as pdsimpsons = pd.read_html('https://en.wikipedia.org/wiki/List_of_The_Simpsons_episodes_(seasons_1%E2%80%9320)')
Now I have 20 tables stored in mysimpsons list. We can select the second table by indexing:
# getting the first 5 rows of the table "Season 1" (second table)
simpsons[1].head()

4. Sending Messages on WhatsApp
The easiest way to send messages on WhatsApp in Python is using a library called pywhatkit.
First, we need to install it, so open up a terminal and run the following command (if possible, install it in a new virtual environment).
pip install pywhatkit
The installation might take a minute, but, don’t worry, writing the script to send the message would take less.
Important note: You need to log in to your WhatsApp account through WhatsApp Web before working with this library. If you’re not logged in, you won’t be able to send messages with pywhatkit. Also, I don’t recommend you to use this library in case you need to send a message that needs to remain private.
Now it’s time to send the message. We can send a message to a WhatsApp contact using the code below.
import pywhatkit# syntax: phone number with country code, message, hour and minutes
pywhatkit.sendwhatmsg('+1xxxxxxxx', 'Message 1', 18, 52)
Keep in mind that the “18” and “52” are the hour/minute your message is being scheduled, so try to set it within 1 or 2 minutes to see the results faster.
Once you run the code, you’ll get this message:
In 5 seconds, web.WhatsApp.com will open, and after 15 seconds, a message will be delivered by Whatsapp.
That’s it! You‘ve just automated 5 boring tasks in record time using Python.
Automate your life! Get my FREE Automation Cheat Sheet by joining my email list with 10k+ people.
If you enjoy reading stories like these and want to support me as a writer, consider signing up to become a Medium member. It’s $5 a month, giving you unlimited access to thousands of Python guides and Data science articles. If you sign up using my link, I’ll earn a small commission with no extra cost to you.
1. SpeedTest with Python
This advanced script will let you test your Internet Speed with Python. Simply you need to install speed test modules and run the following code.
# pip install pyspeedtest
# pip install speedtest
# pip install speedtest-cli#method 1
import speedtestspeedTest = speedtest.Speedtest()
print(speedTest.get_best_server())#Check download speed
print(speedTest.download())#Check upload speed
print(speedTest.upload())# Method 2import pyspeedtest
st = pyspeedtest.SpeedTest()
st.ping()
st.download()
st.upload()
15 Basic Python Libraries for Machine Learning You Need to Know.
It took me way too long to make this article
faun.pub
What is Polymorphism in Python?
Python is one of the most popular programming languages due to its versatility and its user-friendly syntax. Like other…
pythonians.medium.com
2. Search on Google
You can extract the Redirect URLs from Google Search Engine. Install the following mention module and follow the Code.
# pip install googlefrom googlesearch import searchquery = "Medium.com"

for url in search(query):
    print(url)
3. Make Web Bot
This script will help you to automate Websites with Python. You can build a web bot that can control any website. Check out the below code. This script is handy in web scraping and web automation.
# pip install selenium
import time
from selenium import webdriver
from selenium.webdriver.common.keys import Keysbot = webdriver.Chrome("chromedriver.exe")
bot.get('http://www.google.com')search = bot.find_element_by_name('q')
search.send_keys("@codedev101")
search.send_keys(Keys.RETURN)
time.sleep(5)
bot.quit()
SQL Window Functions
CLAUSES AND LIST FUNCTIONS
pythonians.medium.com
Python Collection of Basics and Tricky Questions
Table of Contents:
pythonians.medium.com
4. Fetch Song Lyrics
This advanced script will show you how to fetch lyrics from any song. First, you had to get an API key that is free from the Lyricsgenius website, and then you had to follow the below code.
# pip install lyricsgeniusimport lyricsgeniusapi_key = "xxxxxxxxxxxxxxxxxxxxx"genius = lyricsgenius.Genius(api_key)
artist = genius.search_artist("Pop Smoke",
max_songs=5,sort="title")
song = artist.song("100k On a Coupe")print(song.lyrics)
5. Get Exif Data of Photos
Get Exif Data of any Photo with Python Pillow module. Check out the below mention code. I gave two methods to extract Exif Data of Photos.
# Get Exif of Photo# Method 1
# pip install pillow
import PIL.Image
import PIL.ExifTags
img = PIL.Image.open("Img.jpg")
exif_data =
{
    PIL.ExifTags.TAGS[i]: j
    for i, j in img._getexif().items()
    if i in PIL.ExifTags.TAGS
}
print(exif_data)# Method 2
# pip install ExifRead
import exifreadfilename = open(path_name, 'rb')tags = exifread.process_file(filename)
print(tags)
6. OCR Text from Image
OCR is a method to recognize text from digital and scanned documents. Many Developers use it to read handwritten data. Below Python Code will help you convert scanned images to OCR text format.
Note: You had to download tesseract.exe from Github
# pip install pytesseract
import pytesseract
from PIL import Image

pytesseract.pytesseract.tesseract_cmd = r'C:\Program Files\Tesseract-OCR\tesseract.exe'

t=Image.open("img.png")
text = pytesseract.image_to_string(t, config='')print(text)
Python Collection of Basics and Tricky Questions
Table of Contents:
pythonians.medium.com
7. Convert Photo into Cartonize
This simple advanced script will convert your Photo into Cartonize format. Check out the below example code and Try it.
# pip install opencv-pythonimport cv2

img = cv2.imread('img.jpg')
grayimg = cv2.cvtColor(img, cv2.COLOR_BGR2GRAY)
grayimg  = cv2.medianBlur(grayimg, 5)

edges = cv2.Laplacian(grayimg , cv2.CV_8U, ksize=5)r,mask =cv2.threshold(edges,100,255,cv2.THRESH_BINARY_INV)img2 = cv2.bitwise_and(img, img, mask=mask)
img2 = cv2.medianBlur(img2, 5)

cv2.imwrite("cartooned.jpg", mask)
Python Project Ideas For Beginners
NO PROGRAMMING CODES(GOOD FOR PRACTISE)
pythonians.medium.com
8. Empty Recycle Bin
This simple script will let you empty your recycle bin with Python. Check out the below code to know how to do it.
# pip install winshellimport winshell
try:
    winshell.recycle_bin().empty(confirm=False, /show_progress=False, sound=True)
    print("Recycle bin is emptied Now")
except:
    print("Recycle bin already empty")
9. Python Image Enhancement
Enhance your Photo to make it look better using the Python Pillow library. In the Below code, I had implemented the four methods to enhance any photo.
# pip install pillowfrom PIL import Image,ImageFilter
from PIL import ImageEnhance

im = Image.open('img.jpg')

# Choose your filter
# add Hastag at start if you don't want to any filter below
en = ImageEnhance.Color(im)
en = ImageEnhance.Contrast(im)
en = ImageEnhance.Brightness(im)
en = ImageEnhance.Sharpness(im)# result
en.enhance(1.5).show("enhanced")
I Made a Python Bot to Send “Good Night” Texts to My GF
Here’s how you too can build it very easily.
pythonians.medium.com
A Quick Introduction to the Programming Terms: Python Complete Course
Introduction
to the Programming Terms: Python Complete Course Introductionpythonians.medium.com
10. Get Window Version
This simple script will let you get the full window version you are currently using.
# Window Versionimport wmi
data = wmi.WMI()
for os_name in data.Win32_OperatingSystem():
  print(os_name.Caption)# Microsoft Windows 11 Home
Python Collection of Basics and Tricky Questions
Table of Contents:
pythonians.medium.com
11. Convert PDF to Images
Convert all Pages of Pdf to Images with the following piece of code.
# PDF to Imagesimport fitzpdf = 'sample_pdf.pdf'
doc = fitz.open(pdf)

for page in doc:
    pix = page.getPixmap(alpha=False)
    pix.writePNG('page-%i.png' % page.number)
12. Convertion: Hex to RGB
This script will simply convert Hex to RGB. Check out the below example code.
# Conversion: Hex to RGBdef Hex_to_Rgb(hex):
    h = hex.lstrip('#')
    return tuple(int(h[i:i+2], 16) for i in (0, 2, 4))print(Hex_to_Rgb('#c96d9d'))  # (201, 109, 157)
print(Hex_to_Rgb('#fa0515')) # (250, 5, 21)
5 Killer Automation Scripts in Python
Here are some awesome automation scripts that you can use in your Python projects.
pythonians.medium.com
A Quick Introduction to the Programming Terms: Python Complete Course
Introduction
to the Programming Terms: Python Complete Course Introductionpythonians.medium.com
13. Web Status
You can check the website is up or down with Python. Check the following code, 200 status means the website is Up and if you got 404 status that means the website is down.
# pip install requests#method 1import urllib.request
from urllib.request import Request, urlopenreq = Request('https://medium.com/@pythonians', headers={'User-Agent': 'Mozilla/5.0'})
webpage = urlopen(req).getcode()
print(webpage)  # 200# method 2import requests
r = requests.get("https://medium.com/@pythonians")
print(r.status_code) # 200