


Well there are quite a few, and here we will see the 50 most used sorted by category:
- Files management
- Network commands
- System updates
- Packages management
- System management
- Raspbian commands
- Misc commands
- Warrior commands
This list is based on my experience on Raspberry and Linux in general
Everyone has a different use of his system and can use more often commands that are not present here
The goal is really to introduce the essential commands to start, and not to make an exhaustive list
Table of Contents
Files management
These commands are the basics that every Linux beginner should learn
Maybe you already know them, but it will be a reminder
The Linux arborescence is a Tree, starting at the root: /
Each subfolder created under is accessible with /
Ex: /home/pi => pi is a subfolder of /home, home is a subfolder  in /
Don't forget to use sudo if you are not allowed to access the file or directory (sudo gives you administrator privileges for the command that follows)
- cd <path>: Changes directory, go to the specified folder in the files tree
- cd /home/pi
- ls: Lists the files and directory in the current or specified folder
- ls
- ls /home/pi
- ls -latr /home/pi
- mkdir <folder>: Creates a new subfolder in the current or specified folder
- mkdir myfolder
- mkdir /home/pi/myfolder
- cp <file> <destination>: Copies a file or a directory to another location (to copy a complete directory you need to add the -r parameter for “recursive”)
- cp test.txt /home/pi/Documents/
- cp /home/pi/test.txt /home/pi/Documents/
- cp -r /home/pi/test/ /home/pi/Documents/
- mv <source> <destination>: Moves a file or a directory to another location
- mv /home/pi/test.txt /home/Documents/
- mv /home/pi/test/ /home/Documents/
- cat <file>: Displays all the content of the specified file
- cat /home/pi/README.txt
- more <file>: Displays the content of the specified file, page per page (enter or spec to continue, q to quit)
- more /var/log/syslog
- tail <file>: Tail allows you to display the end of a file, it’s useful to check new entries in a log file
- tail /var/log/syslog
You can specify the number of lines to display with -n
- tail -n20 /var/log/syslog
And finally, my favorite is the option -f to displays new lines in real-time
- tail -f /var/log/syslog
- head <file>: It’s the same as tail but to display the beginning of a file
- head /home/pi/file.txt
- head -n20 /home/pi/file.txt
- grep <string>: Grep is a powerful tool to search string in a text. You can use it to search something in a file or to filter the output of another command or script
Basic usage:- grep dhcp /var/log/syslog
As I say, you can use it on a file or a script output:
- cat /var/log/syslog | grep dhcp
- /home/pi/myscript.sh | grep error
- ls -latr | grep php
And finally, there is a lot of options to use with grep, like regular expressions or options to display lines before (-B), after (-A) or around (-C) the search string
You can also use -v to display everything except the input string- grep 'dhcp\|dns' /var/log/syslog
- grep -A2 -B4 'Fatal error' /var/log/apache/error.log
- grep -v 'Notice' /var/log/apache/error.log
If you like this tool, I recommend you to read the man page to know exactly what you can do with
- man grepexactly
- nano <file>: Nano is text editor. It would need an entire article to go into detail
But quickly, it allows you to edit a file, and save your changes with (CTRL + O, Enter, CTRL + X)- nano /home/pi/myscript.sh
You’ll find all actions available at the bottom of the screen
- rm <file>: Deletes a file. For a folder add option -rf (recursive and force)
- rm monscript.sh
- rm -rf /home/pi/scripts/
- tar -c: You can use tar to store files into an archive. It’s often used with gzip to compress files
- tar -cvfz archive.tar.gz /home/pi/Documents/mydirectory
-c: create an archive
-v: verbose
-f: filename of the archive follow
-z: compress files with gzip - tar -x: It’s the same command but to extract files
- tar -xvfz archive.tar.gz
-x: extract an archive
- find: As the name suggests, find is useful to locate files on your Raspberry Pi
- find /home/pi -iname *.tar.gz
There is a lot of options to help you find the good file (size, last modification date, …)
- pwd: Pwd lets you see in which directory you are.
- pwd
- tree: Another great tool to analyze your current location in the files tree. It will show you the entire lower tree (see the example below)
- tree
pi@raspberrypi:/var/log $ tree
.
|-- alternatives.log
|-- alternatives.log.1
|-- alternatives.log.2.gz
|-- apt
|   |-- eipp.log.xz
|   |-- history.log
|   |-- history.log.1.gz
|   |-- history.log.2.gz
|   |-- term.log
|   |-- term.log.1.gz
|   `-- term.log.2.gz
...
Network commands
Shortly after your first Raspbian installation, you’ll surely need some of this commands to help you with the network configuration (especially if you are on a lite version or with SSH)
Configuration
By default, the Raspberry Pi 3B+ comes with 2 interfaces (Ethernet and WiFi)
The ethernet is called eth0 and the WiFi is wlan0
You have to use these names with some of the commands below
- ifconfig: Displays your current network configuration, mainly your IP address if connected
- ifconfig
- ping <ip>: Sends a ping packet to another IP on the network to check if the host is alive
- ping 192.168.1.1
- ifup <interface>: Enables the specified interface
- sudo ifup eth0
- ifdown <interface>: Disables the specified interface. Could be useful to disable WiFi if you are already connected by cable for example
- sudo ifdown wlan0
File transfer and remote connection
- wget <url>: This command allows you to download a file from the Internet
- wget https://wordpress.org/latest.zip
- ssh <user>@<ip>: SSH is a network protocol that provides you a way to connect securely to a remote computer
- ssh root@192.168.1.201
- scp <file> <user>@<ip>:<path>: scp can transfer a file to a remote computer over SSH
- scp test.txt root@192.168.1.201:/root/
- rsync <file> <user>@<ip>:<path>: rsync does almost the same thing but with a delta comparison algorithm and some optimizations to transfer files faster
- rsync test.txt root@192.168.1.201:/root/
- rsync -auzr /home/pi/Documents/* /home/pi/backups/Documents/
As you can see, you can also use rsync for local files synchronization
System updates
Just after the network configuration, you’ll have to update your system to get the last version of each default packages installed
On Raspbian, and generally on all Linux distributions, you'll have a package for each app or command you install
A list of all available packages is called a repository
Once installed, you need to update this repository and all your packages regularly to keep your system safe
These commands explain you how to do this
We'll need sudo for all these commands
- apt-get update: Downloads the last repository version for each one you have in your configuration (/etc/apt/sources.list)
- sudo apt-get update
- apt-get upgrade: Updates all installed packages if needed
- sudo apt-get upgrade
- rpi-update: Only use this if you know what you do.
This command will update everything on your Raspberry Pi (firmware, packages, …) and can potentially break something- rpi-update
Packages management
After that, you may want to install new packages on your Raspberry Pi
Here are the commands you need to know to do this
- apt-get install <package>: Installs the specified package(s)
- sudo apt-get install phpmyadmin
- sudo apt-get install vim htop
- apt-get remove <package>: Removes a previously selected package
- sudo apt-get remove vim
- apt-cache search <search>: Searchs for a package name in the packages list (repository)
- sudo apt-cache search myadmin
- sudo apt-cache search php
- dpkg -l: Lists all installed packages on your system. You can use grep to find a specific package
- dpkg -l
- dpkg -l | grep myadmin
System management
Here are the commands you’ll often use to manage your Raspberry Pi hardware
- reboot: As the name says, this command will restart the Raspberry Pi immediately
- sudo reboot
- shutdown -h now: This is to stop the Raspberry Pi immediately
- sudo shutdown -h now
You can replace “now” by a specific time (shutdown -h 12:05)
- service <servicename> <action>: This command allows you to start or stop services
- service apache2 start
- service apache2 stop
Sometimes there are other options, depending on the service, for example:
- service apache2 reload
- service apache2 restart
Don’t type any action to see all those available:
- service apache2
- update-rc.d <service> <action>: On Debian, this command allows you to manage the service start or stop on the system boot
To start a service on boot:- sudo update-rc.d ssh enable
To disable start of the service:
- sudo update-rc.d -f ssh remove
The -f option is here to force the symbolic link deletion
This command is only for service
To start other scripts or commands on boot, you have to edit the /etc/rc.local file- sudo nano /etc/rc.local
- ps: This command displays all running process on your Raspberry Pi
The basic command is this one to display everything:- ps aux
You can also display process started by a specific user:
- ps -u pi
This will give you a list like this
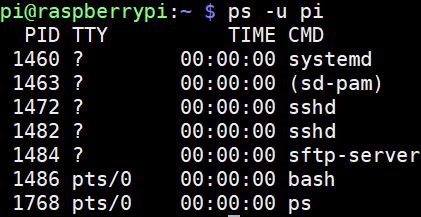
The process ID (PID) could be useful for other commands, to stop it for example (next command) - kill <pid>: The kill command allows you to terminate a process. You’ll need the process ID to do this (see the previous command)
- kill 12345
Sometime you may need to use the -9 option to force all related commands to stop
For example, if you run 20 commands in a script and kill it, it’ll continue to the next line, not exit the program, except if you use the -9 option- kill -9 12345
You could also use killall to stop all occurrences of a program
- killall php
This command will stop all PHP scripts
Be aware that this commands will immediately stop the process asked, no matter what was going on. It’s not a clean stop
You don’t know what the script is doing so it can damage data or corrupt files
This should be used as a last step, and if possible on the non-critical process - htop: This tool is an alternative to top. It’s more user-friendly than top, with colors and dynamic load bars
- htop
- df: Displays the partitions list, with the disk space used and available for each one
- df
- df -h
-h option is for the human-readable format
- vcgencmd measure_temp: You may not remember it, but this command displays the current CPU temperature
- vcgencmd measure_temp
Raspbian commands
Most of the commands from this post are basically Linux commands
But Raspbian has some exclusive ones that I will introduce first
These are not all essentials, but you may not know them even if you are good with Linux
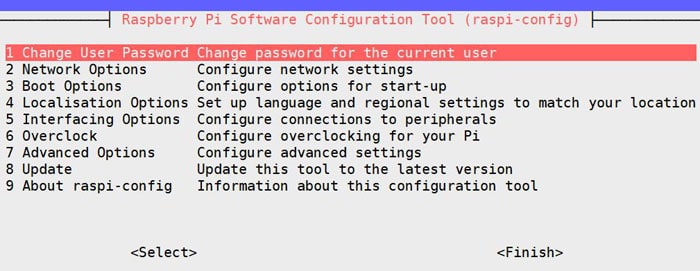
- raspi-config: This tool allows you to manage all the configuration from a terminal or an SSH connection
- sudo raspi-config
- raspistill: If you have a camera plugged in the camera module, this command takes a shot and save it to an image file
- raspistill -o image.jpg
- raspivid: It’s the same command but for video capture from the camera
- raspivid -o video.h264 -t 10000
-t parameter is the time of the capture in milliseconds
- raspi-gpio: This command allows you to manage the GPIO pins of the Raspberry Pi. You can either set or get a value
- raspi-gpio get
- raspi-gpio get 20
- raspi-gpio set 20 a5
- raspi-gpio set 20 op pn dh
- raspividyuv or raspiyuv: This command is similar to the raspivid but for a raw YUV video stream
- raspividyuv -o video.yuv
- rpi-update: Only use this if you know what you do. This will update everything on your Raspberry Pi (firmware, packages, …) and can potentially break something
- sudo rpi-update
Misc
Here are some other useful commands that I haven’t managed to place in the other categories 
- history: Linux store any command you type in an archive file. History is the command to use to display this list.
- history
You can also clear all the history
- history -c
Or clear one specific entry
- history -d 123
- crontab: Cron is a tool to schedule tasks on a Raspberry Pi. Crontab is the file where your enter lines for each task to run
- crontab -l
- crontab -e
-l option to display lines
-e option to edit lines
You can use sudo before to schedule tasks to run with root privileges - screen: This tool allows you to let something run in the background even if you close your session
- screen -s <name>
- screen -r <name>
-s option to start a new screen with the following name
-r option to resume a running screen with this name
You can forget the name if you want, an ID will be generated, use screen -r to find it and screen -r <ID> to resume it
With only one screen running, screen -r will resume it directly
Warrior commands
For this last part, I’ll introduce some powerful commands to master your Raspberry Pi
If you start on Linux, you may not need to know this one, but if you want to save time or go further on Raspberry Pi, you should know this commands
- awk: awk is nearly a programming language, it allows you to search string and transform them to display it differently.
So it’ll be difficult to summarize all of the possibilities in a few lines, but I’ll try to give you some examples to understand it
The basic syntax of awk is this one:- awk [-F] [-v var=value] 'program' file
-F is the field separator string (“:” or “,” for example)
-v allows you to define variables to use it later in the process
What I called program is the expression used to process the file, we’ll see this part just after
And finally, the “file” parameter is the file name you want to processHere is a basic example:
- awk -F":" '{print $1}' /etc/passwd
/etc/passwd is the file to parse. The field separator is “:” so we use it in the -F option
Then in the program string, we ask to display only the first column
So this command will display only a list of usernames
This is the simple way to use it if you want to know more, I recommend to read a dedicated tutorial like this one - sed: sed allows you to do similar things to awk, it will transform text to what you want.
As for awk, it’s a complex command to master, and I’ll only introduce it here
The basic syntax looks like this:- sed <option> <script> <file>
So it’s very close to awk on this
Let’s see an example :- sed '/^#/d' /etc/apache2/apache2.conf
Generally, in each configuration file, you’ll find a lot of comments to explain what is each line
This command will display the apache configuration file without comments
We use a regular expression to delete lines starting with #
You have to redirect the output to another file to save it- sed '/^#/d' /etc/apache2/apache2.conf > /etc/apache2/apache2-nocomment.conf
Like for awk, this is just a glimpse of what sed can do
If you want to know more, there is also a good sed tutorial on the same website - cut: cut is the last way I’ll introduce here to transform text. It’s less powerful but it’s simpler to use, so if cut can do it, you’ll probably prefer to use it rather than awk or sed
As the name suggests, cut allows you to extract part of a text or file
The basic syntax is:- cut <options> <file>
- echo <string> | cut <options>
The first one is for a file, and the second one to cut a string directly
A basic example now:- echo "abcdefghi" | cut -c 2-4
This will display only “bcd”
-c option is for the character, so basically, it’ll extract character 2 to 4Here are other options with a file:
- cut -d : -f 1 /etc/passwd
This will do the same thing as the first example of the awk command
/etc/password is a file with “:” use as a delimiter
-d option is to give the delimiter character (“:”)
-f option is to indicate the column to extract (f stands for the field)
So, this will display only the first column and you’ll get a list of usernames - wc: wc stands for Word Count, it allows you to count everything in a file or stream
There are three main options: -l for lines, -w for words and -m for characters
There is also the -c option to get the file size
Wc without option will give you all of this- wc .bash_history
- 668 1977 17979 .bash_history
The first column is line count, second is word count and last is the file size in bytes
Here are some examples of options:- wc -l .bash_history
- ls -latr | wc -l
- wc -w myfile.txt
- lsof: lsof stands for “List open files”. This command displays all files open on your Raspberry Pi
This could be useful to know why you can’t edit a file, or which file lock the unmount process- lsof
- watch: If you are waiting for something, in a file or directory, the watch command could help you to monitor what happens. This will execute the same command every two seconds
- watch date
- watch ls -latr
- watch cat output.txt
You can also change the refresh rate with the -n option
- watch -n10 date
This will display the current date every ten seconds
- netstat: Netstat is a powerful tool to monitor what your Raspberry Pi is doing with the network. For example, you could see every port open and every traffic flow
But netstat is a complex tool that i can’t explain in detail in a few lines.
I will only introduce some basic usages to display all listening connections you can use:- netstat -l
-p option will add the process id (PID)
- netstat -lp
-c option allows you to refresh data continuously
- netstat -lpc
You can find all options in the man page of netstat
- dmesg: This command is useful for troubleshooting your Raspberry Pi boot
It will show you every event that happened in the start sequence
Here you could see errors with drivers or services and understand why something doesn’t work the way you want- dmesg
You will get a column with the time elapsed since the beginning of the boot and a text explaining what happened
There are also normal messages when everything is fine
Conclusion
Here we are.
Now you should have a better idea of commands to learn to get the best of your Raspberry Pi
And you, what are your more used commands?
You can see it by analyzing your history file with this kind of command:
Source : https://raspberrytips.com/raspberry-pi-commands/
- history | awk '{CMD[$2]++;count++;}END { for (a in CMD)print CMD[a] " " CMD[a]/count*100 "% " a;}' | grep -v "./" | column -c3 -s " " -t | sort -nr | nl | head -n10